Wednesday, December 30, 2015

Final Finish for 2015

Great grandmother's patchwork quilt - not the typical quilt you see me working on for the Faith Circle of do. Good Stitches.

Great Grandmother's Patchwork ~ a Faith Circle quilt

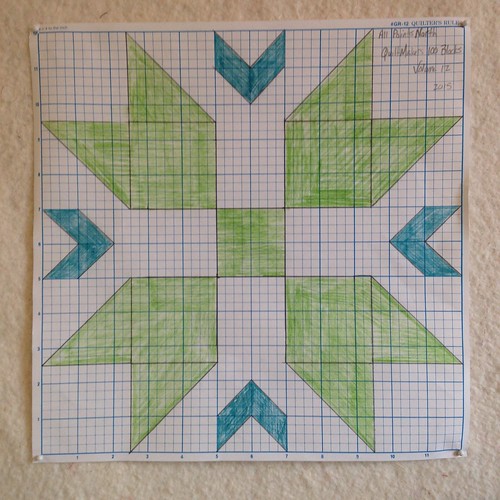
Early in 2015 it was my turn to choose the design for the month of March. I got it in my mind that I'd like to go with sweet and easy, but with a twist. Instead of all the blocks being the same I asked my circle mates to sew a mix of 9, 16, and 36 patch blocks. Here are the instructions I gave them:

This month I'm going to turn us temporarily away from our usual modern quilts and head, instead, in a "passed down through the generations" look. I'm calling it Great-Grandmother's Quilt. I've no idea how this will look actually made up, but we are going to give it a whirl and find out :o) ...please use fabrics with a tan/grayish undertone. 

Great Grandmother's Patchwork ~ a Faith Circle quilt
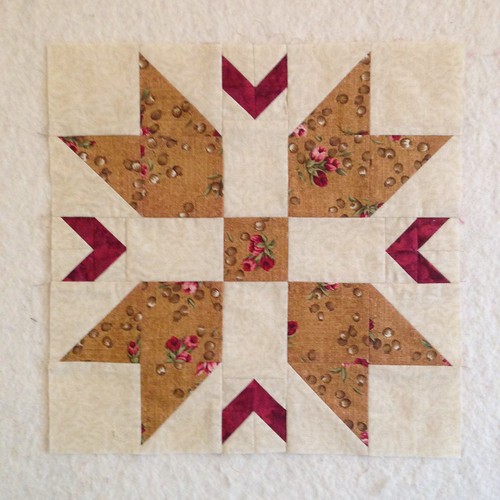
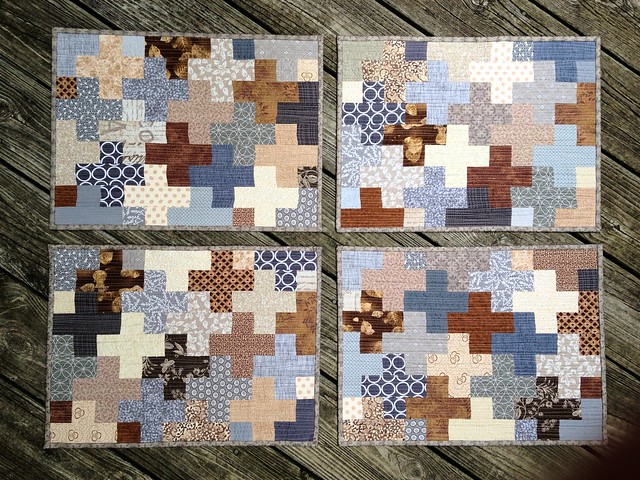
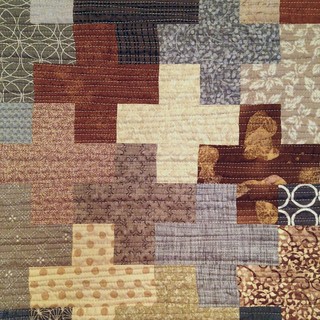
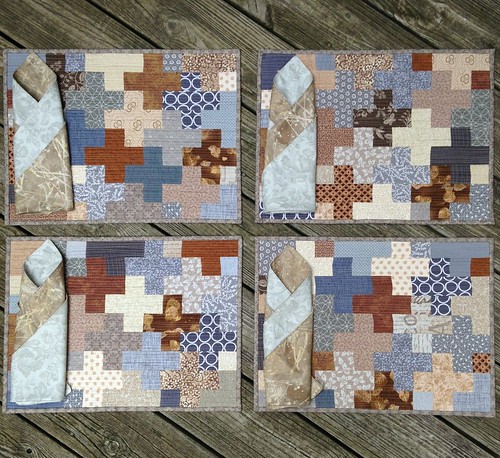
Beautiful old-timey quilt blocks

One of the circle members reflected that her blocks reminded her of the house dresses her Grandma used to wear - Perfect!! As you can see they did a great job on these blocks - a great way to practice that ever-important 1/4" quilt seam.

For this quilt I used the quilt-as-you-go method of assembly. This was a first for me and I'm going to write about it in a separate blog post soon so stay tuned.

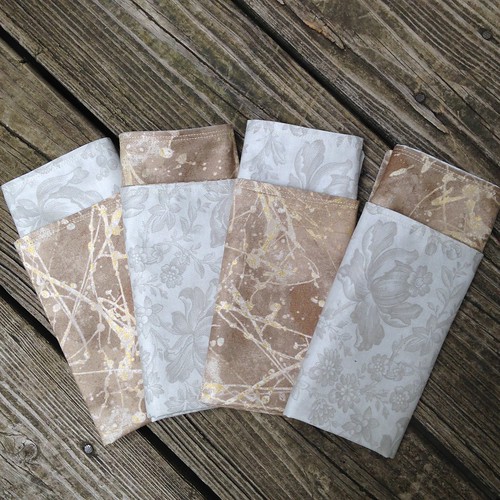
For the quilt back and binding I used a couple of Thimbleberries prints that have lived in my stash for a while. This was the perfect project to put them to use. In addition, I had one extra block left from the front that I included...my motto: leave no blocks unused.

Great Grandmother's Patchwork ~ a Faith Circle quilt
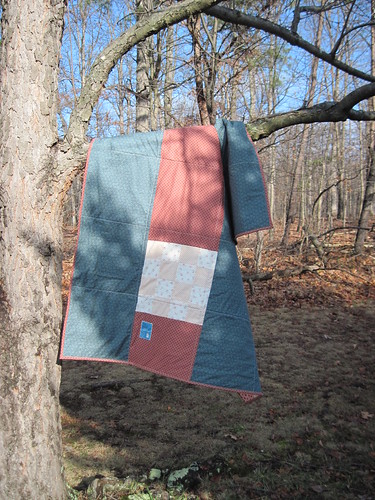
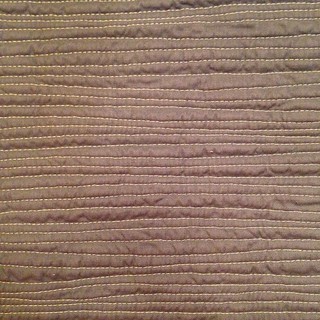
Thimbleberries quilt fabric on the back

I am so happy to have this one finished and on it's way to Restore Innocence - an organization providing aid to the victims of human trafficking. I hope that as it is used it will bring comfort and perhaps a sense of endurance and grit passed down from those who came before us.

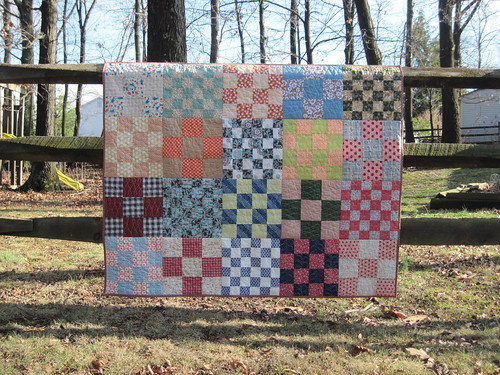
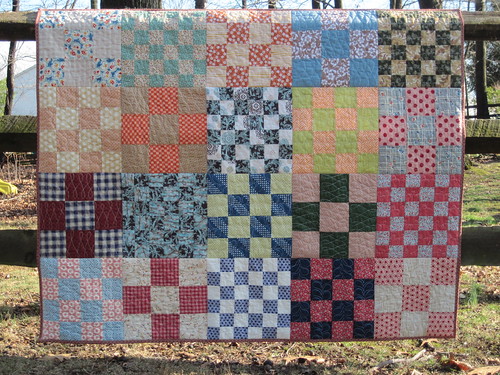
I'd also like to share two quilts made by my local quilt group, Winchester Modern Quilters. These quilts are also on their way to Restore Innocence. They were created from Quilto (Bingo) squares we used in one of our meetings. One of our members then took the squares and created these two cheerful quilts.

Bingo Quilts by Winchester Modern Quilters
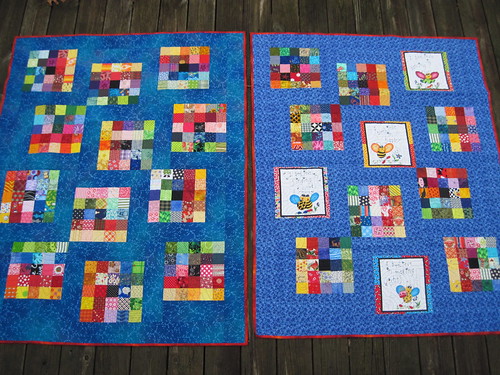
Bingo square quilts - Winchester Modern Quilters

Hoping, as we transition to 2016, you enjoy a year of making meaningful gifts for those you love and hold dear. Happy New Year!

Tuesday, December 22, 2015

Crochet a Little Caroler

I think every knit and crochet enthusiast can relate to that lost feeling of not having anything on the needles/hook and wondering where inspiration for the next project is going to come from. Don't you love finding a sweet little project to work on?

Wee Elves - Crochet Version
Crochet Carolers - my adaptation of the Jolly Wee Elf knit pattern

About a year ago I came across an online yarn shop called Churchmouse Yarns & Teas. They also have a brick and mortar location on Bainbridge Island,Washington - the complete opposite side of the country from where I live. In one of their recent holiday newsletters they featured a sweet knit pattern for a Jolly Wee Elf. I don't knit {yet!}, but I am pretty comfortable with crochet and thought I'd be able to adapt this little design to a crochet version.

Wee Elves - Crochet Version
Crochet Carolers


For my little carolers I used Patons Kroy Sock FX yarn in the Clover colorway. This variegated yarn was so fun to work with as each caroler turned out looking like his little suit was different from the others. For their faces and scarves I used bits of sock yarn I had left over from other projects. I just made myself rough notes on the construction of the caroler so each subsequent caroler is a bit different from the others.

To help the carolers stand up I wrapped a bit of {new} fish tank gravel in plastic and tucked it in the base of the caroler, then continued to stuff with fiberfill. It's really the hats and arms that give them their individual personality.


Crochet Cousin Elf
Merry Christmas!
I can hear these little carolers singing:

O Holy Night! The stars are brightly shining,
It is the night of the dear Savior's birth.
Long lay the world in sin and error pining.
Till He appeared and the Spirit felt its worth.
A thrill of hope the weary world rejoices,
For yonder breaks a new and glorious morn.
Fall on your knees! Oh, hear the angel voices!
O night divine, the night when Christ was born.
O night, O Holy Night, O night divine!

-by Adolphe Adams

These sweet little carolers have gone to live in their new home with my dear friend M :o)

Wishing all of my online friends a
 Blessed and Merry Christmas!

Monday, November 23, 2015

And the winner is...

Such an exciting week this has been! I hope you've enjoyed visiting each of the blogs for Quiltmaker's 100 Blocks, Volume 12 block designers...I know I have :o) It's always fun to learn the inspiration behind the design of a quilt block ~ and how the designers come up with ideas. Such talented ladies they are!

If you make All Points North I sure hope you'll stop by my blog and let me know, or tag me on flickr or Instagram so I'll be sure to see it!


Untitled
All Points North quilt block

For the magazine drawing I asked readers to tell me what is their very favorite quilt block. Wow did I find a wealth of inspiration in the blocks you've named! I'm going to see if I can use one of your favorites to come up with a new variation. The stand out favorite is the humble log cabin block. Whereas this block has a lot of versatility with regard to layout I'm not so sure about finding something to actually change about the block itself. But you never know...I've already been sketching! I'll keep you posted :o) 


I used the Random Number Generator to pick a winner for an issue of 100 Blocks Volume 12 to be sent directly from Quiltmaker's. 


The winner is No. 72!! Hooray!! I've sent Joye an email to let her know she is the magazine winner from my drawing.

Thanks again for joining me as we celebrate 100 Blocks Volume 12! I hope to see you stop by my blog again ~ If you are not already following Shadows of the Blue Ridge you can sign up using Bloglovin, Follow by Email, or Google Friends Connect. All these options are available on the top right sidebar. If you do, be sure to leave a comment so I know you are a new follower :o) Hope you have a great week!

Friday, November 20, 2015

Blog Tour ~ Quiltmaker's 100 Blocks Volume 12

Welcome quilting friends! I'm so happy to have you visit my blog :o) Quiltmaker's blog tours are always a good time ~ you're sure to find lots of inspiration as you visit all the stops!

All Points North is the name I chose for my block, and you can find it in 100 Blocks Volume 12 as block No. 1186. About the time I was planning a new block to submit to Quiltmaker's I was admiring all the Nordic snowflake blocks that were cropping up around quilting social media sites, so I used that basic block design as my jumping off point. My block is a cross between the snowflake block and a Tulip Lady Finger block. I combined dimensions from the snowflake block with the piecing method of the Tulip Lady Finger.  Then, as has become my design method I evaluated the negative (background) areas to see what I could add to the block and ended up with the chevrons.

QM1550-MARTIN
All Points North ~ designed by Debbie Martin

My goal was a block that would create a secondary design, or a totally different look when repeated across a quilt top. In order to see what it would look like as a complete quilt top I inserted a photo of All Points North into Google Slides. Then I copied and pasted multiple times to create a mock-up of a top.

All Points North Quilt Layout
All Points North ~ quilt top mock-up

I was delighted to see that when the block is repeated over the quilt top the background almost becomes the noticeable pattern and the Tulip Lady Fingers become the background! So fun!!

Untitled
My quilting sketch book ~ drafts of All Points North
My typical design process begins with my grid paper composition notebook and a package of colored pencils. I sketch out my idea and begin coloring. If you look at this page you can see I used half-square triangles the first time I added the chevrons. The second time I changed to flying geese.

I also experimented with the placement of the chevrons. I chose to keep them closer to the edge of the block (top drawing) since my goal was to create a secondary design. I thought this would be more evident if the chevrons matched points when multiple blocks are sewn together.


Once I have the design finalized I draw it again on 12" square Quilter's Rule paper so I can see what it looks like at full size. Doing this helps ensure I cut my fabric to the correct dimensions when I make a test block.

Untitled
Full size sketch of All Points North


Here's a picture of All Points North the first time I made it. If you look closely you can see I used the half-square triangles for the chevrons. It was after making this test block I decided to switch to the flying geese in order to reduce the number of seams.

Untitled
All Points North using traditional fabric


Maybe seeing how a piece of grid paper and colored pencils are all you need to design a quilt block has inspired you to try your hand at design. If so, I hope you'll let me know! 

Quiltmaker's is generously giving one of my blog readers a free issue of 100 Blocks, Volume 12. To be entered into the drawing just leave me a comment telling me what is your favorite quilt block - maybe I will use it as a jumping off point for a new design :o) If you suspect you may be a "no reply" blogger please make sure to include your email address in your comment. I'll draw a random winner on Sunday evening, November 22.

I hope you've enjoyed stopping by :o) Don't miss out on all the other blogs featured in the tour. They can be found on Quilty Pleasures blog.

Monday, November 16, 2015

Log Home *sweet dreams*

You probably noticed that my blog posts vary quite a bit in frequency. My best intentions are to blog on a somewhat regular basis, but sometimes other things tend to crowd out blogging. Lately these other things have been designing our new home and experiencing a book hangover! {Definition of book hangover: when you've finished a book and you suddenly return to the real world, but the real world feels incomplete or surreal because you're still living in the world of the book - quote Urban Dictionary.com} In the past four months I've read 15 novels written by Earlene Fowler and enjoyed every single one of them! I really did feel a bit lost when I'd finished the final one.

Today I thought I'd share an update on our log home. As I've mentioned in the past, my husband and I are dreaming {and planning} on building a small log home on land we purchased several years ago. When you look at the gravel road on my blog header you can see where we will be building. Our land is on the right hand side of this road. We've spent the last eight months working with a builder on the design of our home.

House Plans
Design drawings for our log home

It's been a fun and educational process. We'd been dreaming of our log home ever since we started looking for land about seven years ago. As we searched for land we had two main criteria:
  • my husband wants to be able to hunt on it
  • I wanted to make sure it did not have a scary mountain driveway that would stress me out every time I drove on it
We were blessed to find land less than 20 miles from where we currently live. This allows us to stay with our current jobs, remain in our beloved church, and keep all the same service providers we've used for the past 29+ years. Our lot is just about a half mile off a well maintained state route. Neighboring homeowner's frequently comment on seeing bear, deer, turkey, wildcats, squirrel, and other small animals.

Untitled
Work book to help plan your home
Last fall I attended a Log & Timber University in order to gain basic knowledge about the process of building a log home. One of the things they encourage is developing a priority list of features you'd like in your home. Then, as you need to make choices regarding what to include you have something to help guide your decisions.

While attending the log home show I met a builder/dealer for Katahdin Cedar Log Homes who works in the area we plan to build. A couple months later he came to meet us at our lot and look over the land. Both my husband and I liked him immediately. He has been a wealth of information and so patient as we've worked through many drafts of home plans.


One booth at the log home show is called the newsstand. Here you are able to purchase bundles of outdated log home magazines at a greatly reduced price. I've done this twice now. Most of the homes in the magazines are way too fancy and elaborate for our needs, but it is so helpful to look at things such as floor plans, kitchen & bathroom layouts, wall treatments (all log interior versus including other wall materials), porches, etc.

Untitled
A few of the many magazines I've collected for reference

As with any custom home construction it is difficult to know what you want to actually afford without just jumping in and submitting a preliminary design to a builder for pricing. Let me just say I have a new appreciation for the fancy roof lines, custom windows, and elaborate floor plans we see all around us in builder/developer neighborhoods. We quickly found that plain and simple best met our needs.

When first having to face up to choosing between the dormer windows or the fireplace we've always dreamed of it was a bit hard. But, we tend to live in the practical world and found that after a day or so of lamenting that ALL our dreams cannot be included we were perfectly happy to whittle down to what we really want to afford. We had no idea how much time and doodling goes into designing a floor plan that both meets your needs, and fits into the footprint dimensions of a home...we've put many, many hours into this over the last several months.

Untitled
Approximate location of our home

Anyway, at this point we are pretty much finished with our final designs and hope to be advancing to the next step of the process soon. I hope you've enjoyed this little peak into our log home journey. Hopefully in the near future there will be more excitement to share as we move forward :o)

Monday, November 2, 2015

Going on a barn tour...to see quilts!

Recently I had the opportunity to join a fun bunch of ladies from my local quilt group on a barn quilt tour. We spent the day traveling the Garrett County, MD barn quilt trail.  Oh did we have fun!

Circle of Life Barn Quilt


Our day began bright and early. The tour is about 2+ hours from where we live so we had plenty of time to chat and get to know each other better. On our way to the tour we stopped at the Spruce Forest Artisan Village. The buildings are all old cabins that have been restored and relocated to this village.

IMG_3055
Ladies from my local quilt group

We quickly enjoyed the beauty of the village - going in a few of the shops to watch the artists at work.

Spruce Forest Artisan Village
A sample of the beautiful cottages!

From there we made a quick stop in Grantsville, MD at the Four Seasons Stitchery Quilt Shop - we couldn't pass up that opportunity! Everyone there was so friendly :o)

Then we began our tour of the barn quilts. I'll just leave you to enjoy the beauty of the countryside and the barns and see you at the end of the tour!

Double Pinwheel
Double Pinwheel Barn Quilt

Blazing Star Barn Quilt

Amish Dahlia Barn Quilt
Snails Trail Barn Quilt
Snails Trails Barn Quilt

Crazy Quilt Barn Quilt
Crazy Quilt Barn Quilt - in the SNOW in October!

County Fair Barn Quilt
County Fair Barn Quilt - appropriately chosen for this location! 

Delectable Mountains Barn Quilt
Flying Geese Barn Quilt
Flying Geese Barn Quilt - our favorite of the day!

Sallie's T Barn Quilt
Sallie's T Barn Quilt - Such a funny story on our visit to this barn!

Original Applique Barn Quilt
Bonus Quilt :o)
A bonus quilt on a garage along the trail
LeMoyne Star Barn Quilt
Old Maid's Puzzle Barn Quilt


Garden Maze Barn Quilt

A little corn maze fun!
We had to stop for one last group picture :o)
Now that you've seen these great barn quilts are you interested in making your own? If so, check out this informative article.

We didn't see all of the barn quilts in Garrett County - just those clustered together. This leaves us with the opportunity to go again and finish the tour. It was such a great day! I highly recommend filling up your car with friends and heading out on a barn quilt tour! 

I'd love to hear if you've done a tour where you live - or, which of these barn quilts is your favorite?

Monday, October 19, 2015

The Scarves of Summer

Although quilting is what I blog about the most, personally I enjoy crochet just as much. I almost always have two crochet projects going on at any one time. It is fun to have one project that challenges and grows my skills and a second one that falls into the "social crochet" category. This type of crochet is portable and easily done in situations that do not require a great deal of concentration and counting - such as riding in the car, or while visiting with others.

This past summer I did a lot of social crochet and loved every minute of it. I was able to make four gift scarves. This first one was with an alpaca/acrylic mix yarn. A sweet young lady, S, whom I've know for her entire life, was heading off to the University of Virginia. I thought a school spirit scarf would be a fun gift :o) The yarn colors are Dark Apricot and Midnight.

Untitled
School spirit scarf

I found this V-stitch pattern in the Fall 2012 issue of Interweave Crochet. It is the featured stitch for the Thistledown Tunic pattern. This stitch really makes for a warm fabric - perfect for football games!

Untitled
This alpaca yarn is so nice and soft


The next three scarves all feature the same stitch pattern, but are made with different yarns. I believe I may have invented this stitch by accident. I thought I was following the directions for a stitch called the double V, but it turns out I did it wrong. However, I really like how my stitch turned out, so I continued to use it on all three of these scarves. 

The first of the three is made from an acrylic/wool blend Red Heart Boutique Treasure yarn in the Horizon colorway. I just love this yarn and working with the variegated colors was so much fun! I couldn't put it down because I kept wanting to see what was going to come next. This scarf was made as a birthday gift for for my dad's wife, J, in joint celebration of her birthday and retirement :o)

Crochet Infinity Scarf
My interpretation of a double V stitch


Since this double V stitch was so easy to do and looks nice, too, I used it on a scarf for my dear friend M's birthday present. This next yarn is Lion Brand's Amazing in the Aurora colorway. It's a wool/acrylic blend. Goodness the shading in this yarn is beautiful!

Untitled
My interpretation of a double V stitch

Finally, I made a scarf for my favorite birthday buddy, A. This is another sweet young lady whom I've know all of her life. We both celebrate our birthday on the same day, but 34 years apart. This is also Red Heart Boutique Treasure yarn, but in the Abstract colorway.

Untitled
My  interpretation of a double V stitch

These four scarves saw me though several hours of car travel and sweet summer evenings out on the deck. Thank goodness for friends and relatives to make things for!

I'd love to hear about what's been on your knitting needles, or crochet hook :o)

Monday, August 10, 2015

Change Your Mind Slipcover Bag

Do you ever make plans for a fun project...buy the pattern...and the fabric, but then never make the project? Yeah, me too. Until now that is. Back in July of 2013 I wrote about my plans to make a new bag for Selfish Sewing Week on flickr, (click here to read about how this bag journey began) - even commenting on how I may not wait for the official start date to begin...two years later the bag is finished.

IMG_2998
Change Your Mind Slipcover Bag - brown dots exterior

After completing the Social Climber quilt for the Faith Circle I decided it was time to take a quick break from large projects and do something smallish and fun. My eyes landed on a beautiful trio of Flea Market Fancy fabrics neatly folded on a shelf and I knew it was time to make the Change Your Mind Slipcover Bag. I had almost everything I needed on hand: fabric, interfacing, thread, only needing to purchase a zipper.

Change Your Mind Slipcover Bag - main body
Main Body of Change Your Mind Slipcover Bag

For the main body I used this Leaf & Dot print because it was a good neutral and {I thought} my least favorite fabric of the trio. Well...once I finished the main body I discovered the simple elegance of this print and it quickly became my favorite! The pattern calls for heavy weight interfacing to be used on all bag parts, but I wanted to add a bit more substance to the bag so I used iron on fleece for the main body instead. The interior of the bag includes patch pockets on one side and a zipper pocket on the other. More about this neat zipper installation to follow :o)

The whole purpose for this pattern is to create slipcovers for your bag so you can change up the look as desired. Now the pattern calls for making the slipcover with a lining fabric on one side and your chosen "new look" fabric on the other. To me that seemed a bit of a waste. Instead I decided to make one slipcover and have it be reversible.

Reversible slip cover
Flea Market Fancy fabrics

Here you can see I used Flea Market Fancy Bouquet on the outside and Posie on the inside. There just seemed to be no good reason to make two separate slipcovers. For the slipcovers I used the heavy weight iron on interfacing like the pattern called for. You can see that I experienced some bubbling - I've never had this issue before because I'd always used the heavyweight interfacing with home dec fabric, not quilting cotton. Not sure what's up with this. Debbie, over at A Quilter's Table, just happened to mention this same issue in a recent post.

Change Your Mind Slipcover Bag - the interior
Interior of bag

This is what the interior of the bag looks like with the slipcover attached. See how it folds over the top of the main body and is held in place with buttons? I learned some new skills while making this bag:

  • a completely new way to install a zipper into the lining fabric {so cool!} I don't know what this method is called, but it creates such a neat zipper opening and is not at all hard to do
  • make and attach facings
  • how to sew buttonholes!! Oh my goodness...if I'd have known how simple buttonholes are, and how fascinating it is to watch my sewing machine make them, I'd have done them long ago!


IMG_3002
Change Your Mind Slipcover bag - orange plaid exterior

Here are the modifications I made to the bag:

  • slipcover is reversible
  • I added the additional brown dot and orange plaid fabric bottoms just for fun
  • top stitching was added to both the main bag and the slipcover to make them a bit more dressy
  • on the recommendation on someone's pattern review I installed the buttonholes to the facing before attaching them to the slipcover
If I were to make this bag again I would put some type of divider and additional pockets inside. It's a pretty large bag and some interior organization would be a nice addition. In fact, I will probably go ahead and make something for this one and hand sew it in. In addition, I think I'd add either a zipper or snaps to the top to close it. As stated it is a pretty large bag and feels a bit open. All in all it is a very well written pattern and I enjoyed making this slipcover bag :o) 

What new sewing skills have you recently learned? I'd enjoy hearing about them - leave me a comment :o)


Monday, August 3, 2015

Setting a New Table

In my previous post I mentioned a wedding gift I had the joy to make early this summer. A dear young lady, K, whom I've know since before she was born was to get married to an equally dear young man, M, {is it okay to call a young man dear} and this happy occasion called for special gift. I knew I wanted to make a set of placemats.

+ Plus Block Place Mats +
Plus Block Place Mats

While looking through their online wedding registry I noted a decided bent for neutral colors...specifically cream, brown, and gray. This not being a typical color combination for me I inquired of the bride's mom if I should add a pop of anything else? She consulted with the bride's sisters and it was established that all neutral was the way to go.


For color inspiration I used a photo of a shower curtain they included in their registry. A friend of mine had just finished a sweet mini quilt featuring the Plus Block and I immediately thought it would be a great pattern to weave these colors together. Following my usual design path I pulled out my composition notebook and drew up a plan. Next up I pulled a large variety of fabrics from my stash and set out to begin piecing.

I love the combination of these neutral fabrics! A good reminder to step outside of my creative comfort zone more often :o)  To verify that this really was going to turn into a desirable placemat I made the first one up complete with quilting. Instead of using batting I used two layers of flannel - I wanted the placemats to have some body to them, but didn't want them to seem heavy.

Organic quilting on Plus Block placemat
Placemat front - close up

For the quilting I used a favorite method: organic straight lines closely spaced. A run through the washer and dryer really brought out the great texture. Even the placemat backs look nice! At this point I was convinced this was the plan and proceeded to make the remaining three mats.

Organic straight line quilting
Placemat back - really shows the texture!
No placemats are complete without a set of matching napkins to accompany them. While visiting my brother I happened upon a fabric store and stopped in. I found both a tan and a gray fabric that seemed like they would work nicely for the napkins. They are reversible with tan on one side and gray on the other.

Reversible napkins
Reversible napkins

All in all this was a fun sewing project to work on. I wish this new couple many, many years of happiness and God's richest blessings upon their marriage. 

Placemats & Napkins - the complete set