Friday, December 30, 2016

Inspiration - Nordic Style

Do you ever ponder where inspiration comes from? I enjoy thinking about that sometimes...looking at things I've made and reflecting on where the idea came from.

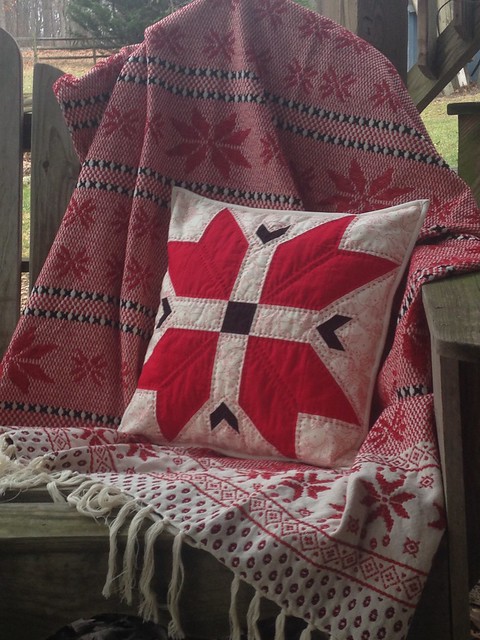
Nordic throw with a matching pillow

Early last fall I received a Country Curtains catalog and saw this picture of a cozy and inviting Christmas bedroom. I was dreaming of how perfect something this look would be in the guest room of our log home :o) I just knew that great Nordic throw would be the perfect companion for my All Points North quilt block.

Untitled
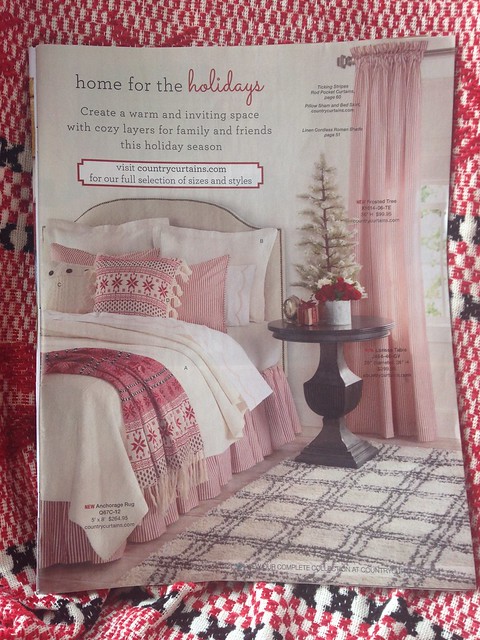
Festive Christmas bedroom - Country Curtains catalog


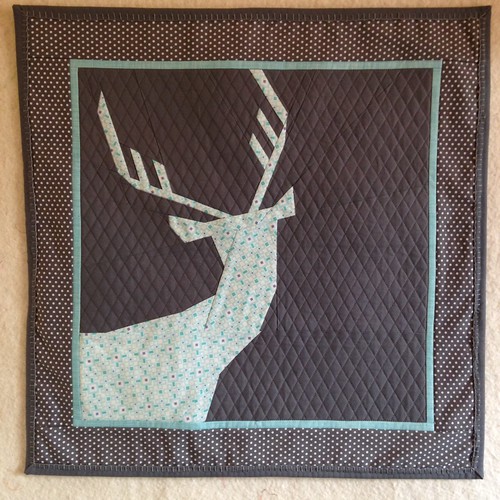
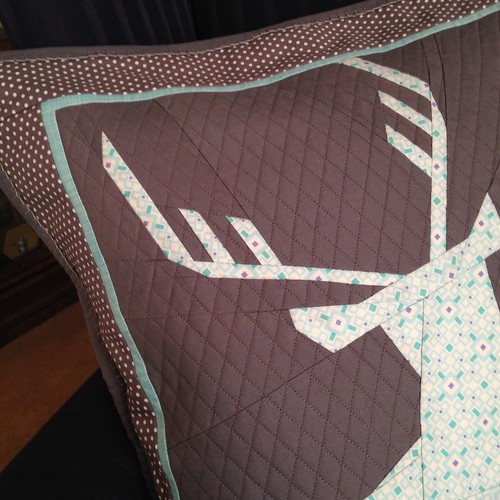
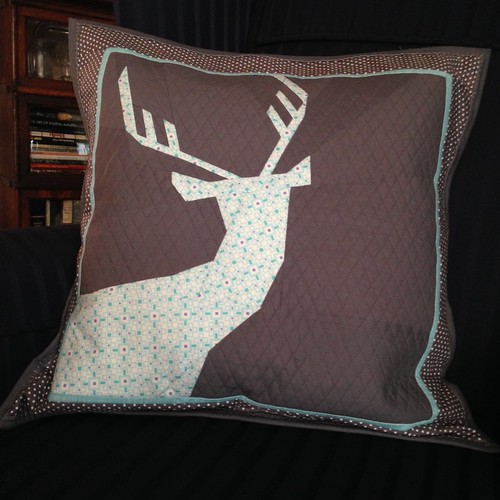
I purposely kept my Christmas making to a minimum this year because of all the time being spent on preparations for our log home. However, if you're a maker then you know it just doesn't feel like Christmas if you don't have at least one handmade gift to give ;o) This pillow was a nice project to occupy myself during the evenings between Thanksgiving and Christmas. Deep saturated reds and inky black fabrics gave a nice crisp look to this Nordic-style block.

All Points North - Christmas Pillow
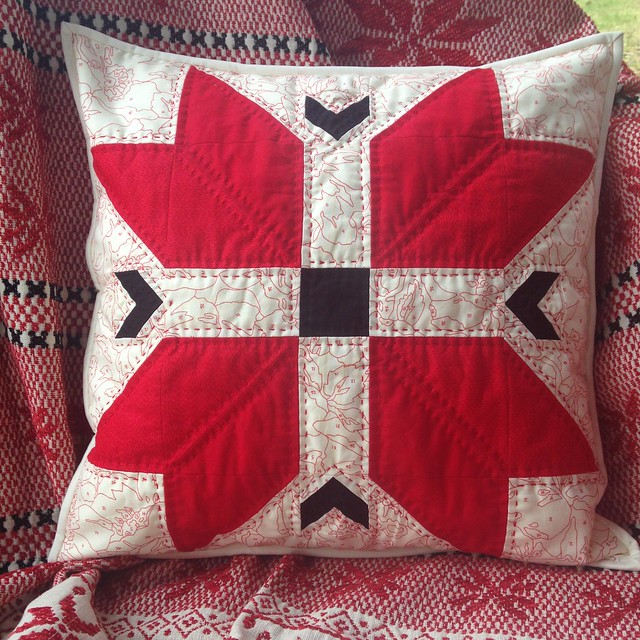
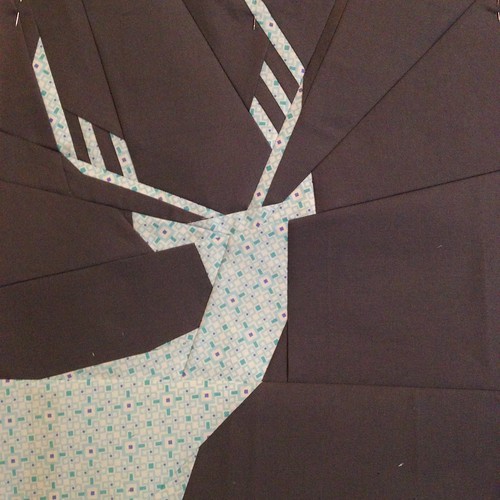
All Points North - Nordic style

The background fabric was a fun departure from my comfort zone - my first inclination was to play it safe and use Kona bone (a solid fabric), but I have long admired printed background fabric in the work of others. I decided to go for it and pulled from my stash the red/cream Purebred Derby Preakness paint-by-number fabric from one of my favorite designers, Erin Michael. It adds a fun layer of dimension to the pillow.

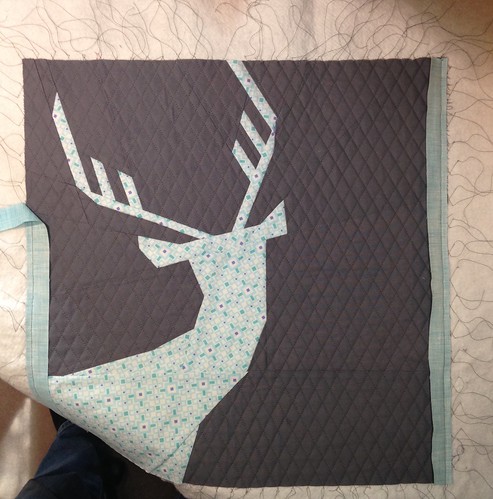
The beautiful hand work of Mary Dugan (Molly Flanders Makes blog) enticed me to quilt this with big stitches using perle 8 cotton. Hand quilting is a comfortable, slow process that allows me to sit in the living room with my husband in the evenings instead of at my sewing machine.

Envelope-style pillow back
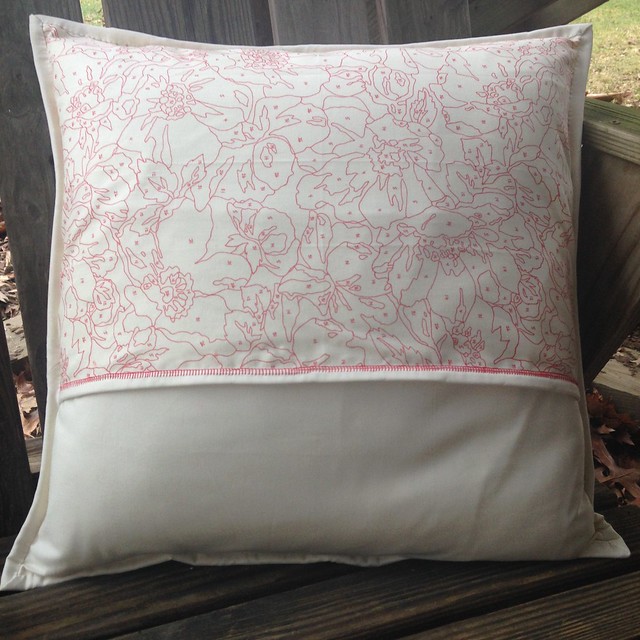
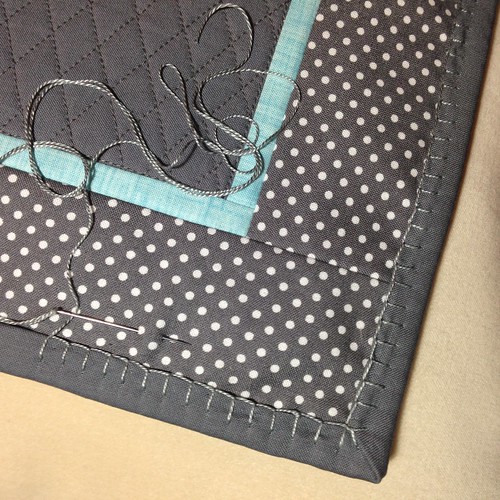
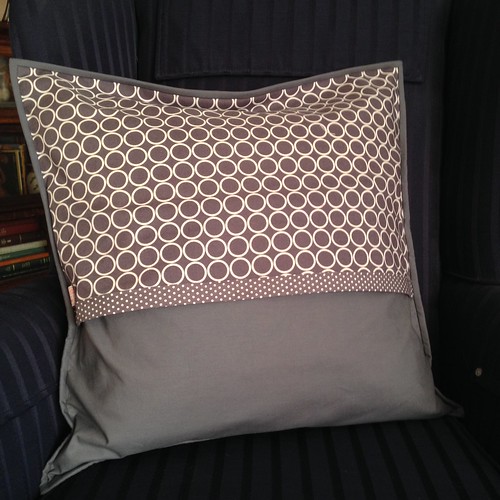
Envelope-style back with buttonhole stitch trim

My favorite way to make a pillow back is the simple envelope style. I always plan on a generous overlap and usually use 2/3 of the pillow dimension for my fabric measurements - this ensures no pillow insert peeking out. To add just a touch of cozy to the back I added machine buttonhole stitch to sew down the binding across the back.

This was a satisfying final project for 2016 and has been gifted to a sweet friend. I think that cozy Christmas bedroom picture provided just the inspiration I needed :o)

As 2016 comes to a happy close I'm looking forward to what 2017 brings. Hopefully, a move into our log home for my family! What are you hoping for in the New Year?

Blessings,
~ Debbie

Monday, November 28, 2016

Baby shower goodness

How fun it is to find just the right pattern when needing to make a gift. A few years ago Julianna, of Sewing Under Rainbow, shared a paper pieced tutorial for the Not So Spring Deer. This deer, to me, looks like a young buck, and therefore perfect to honor the upcoming arrival of a certain little mister :o)

Paper pieced deer wall hanging
The "Not So Spring Deer" paper pieced pattern as a wall hanging

This little man's mama is creating a woodland setting in baby's nursery and using neutral colors with a touch of blue. The geometric print from Kate Spain's Good Fortune line seemed the perfect print for paper piecing as the densely printed pattern blurs well where the paper pieces come together. Looking through my stash I found a nice variety of medium dark gray fabrics to round out the project.

Quilting process shot
30 degree diamond quilting

I wanted the solid gray background fabric to have a dense quilting that did not extend into the borders. To accomplish this I layered the deer panel onto the batting; then used a ruler to mark 30 degree diamonds, and the edge of the walking foot to quilt the lines approx. 1/2 inch apart. Each time I came to the deer I cut the thread, knotted it, and wove it in. After the quilting was finished I stitched the borders onto the batting.


Half inch 30 degree grid quilting
30 degree diamond quilting

The dense quilting does a nice job of making the deer stand out from the background. A thin blue 1/4 " border adds a nice frame, and then some fun polka dots to enhance the young look of the buck.

Perle cotton button hole stitch
Perle cotton buttonhole stitch
Somewhere I remembered seeing buttonhole stitch used to sew down binding. I thought this would add a nice hand-stitched look as well as a texture, and I just happened to have the perfect gray perle cotton on hand! I love how it looks, but was surprised at how hard it is to do buttonhole stitch through cotton; definitely hard on the hands. I don't think I could do this on a larger quilt.


Envelope style back
Envelope style back

I found two more prints in my stash which are just the right shade of gray to finish out the mini quilt. For the back I opted to go with an envelope closure; this allows the mini to be used either as a wall hanging, or a pillow. Using fun prints makes the back just as show-worthy as the front :o) Projects like this are so much fun! I love finding just the right fabrics and considering each little detail.

Paper pieced deer as a pillow
Not So Spring Deer as a pillow

 I'm praying for the safe arrival of this sweet little boy, and blessings for his mama and daddy as they experience the joys of their first baby.


Friday, November 25, 2016

Cabin update & contest winner

I've been thinking that's it's time for a cabin update! Would you like to see how our Katahdin Cedar Log Home is coming along? Join me for a tour :o)

October 30, 2016 Progress
Loving the green shingles and window trim!

This picture was taken about a month ago. Our builders, Cabin Run Construction, are doing such a nice job! The roofing is complete and all windows are installed in this picture. The log walls are ready for the finish/protective sealer to be applied. We've decided to go with Perma-Chink in the Cedar colorway; this seems like a natural choice since our home is built with cedar logs from Maine.

Full glass door on right side of log home
Door into great room

This side door leads into the great room. I'm sure we'll use it a lot for fire wood :o) I'm so glad we decided to wrap the decking around the side of the house. The original plan was to just have a front porch and a back deck. But once we saw how the land would be graded around the house we opted to have this decking to connect the front and back. It's one of my favorite features.

Living room sliding glass door
Sliding glass door on back of house

From the living room to the back deck we opted for a sliding glass door instead of a swinging patio door. This decision was based mostly on my thinking that a sliding door takes up less floor space to operate.

Back decking
Deck off the back of the house

We kept the deck off the back of the house a cozy size. This picture shows how it covers the patio door leading into the lower level. Both panels of the patio door are functional in order to allow large items to be moved in and out with ease. We won't have a carport or garage for awhile so the lower level will need to store kayaks and garden equipment. Since the back is the shady side of the house we had a concrete pad poured under the deck to prevent a muddy mess.

October 30, 2016 Progress
Quadra-Fire Wood Fireplace

In the great room the living area is to the left and the dining space to the right. We had a wood burning insert installed in the fireplace for maximum efficiency. This unit has an internal fan and a burn time of up to 16 hours. We are going with native field stone cut to a thin veneer and hope to do a rough hewn mantle. That big pile of wood to the right is actually cedar paneling. Katahdin log homes are built using what they call the energy envelope system. The inside of the house will be lined with rigid foam insulation and then covered with the cedar paneling. So, it looks as if you are seeing the inside of the logs, but it's actually the cedar paneling. This greatly increases the R value of the walls.

Interior partition walls
Looking the other direction...

When you turn around and look the other direction you can see the other rooms of the cabin. On the upper level there is a guest bedroom to the back with a loft and 3/4 bathroom in front. On the lower level the kitchen will be to the left with the front entry hall/mudroom and master bathroom behind. To the right is the master bedroom, laundry closet, and a small office. That yellow LVL beam will be encased to make it more attractive :o)

This is pretty much where we stand right now. We'd hoped to be moving in by the end of the year, but it doesn't look like that's going to happen now. We've been busy picking out appliances, fixtures, and flooring. The decisions are both fun and a bit stressful; knowing these products are expensive, and must last a long time puts pressure to make wise choices.


Okay - now for the results of the Quiltmaker's 100 Block Volume 14 drawing! The Random Number Generator chose No. 18! The winner is Bonnie and she sent me her mailing information which I've forwarded to Quiltmakers. Congratulations Bonnie!


Thank you all for celebrating my block, Order in the Court, with me. If you end up making one I'd love it if you'd tag me! I've already submitted a design for inclusion in Volume 15 which will be published in the spring ~ wish me luck :o)

Order in the Court
Order in the Court by Debbie Martin

Wednesday, November 16, 2016

Quiltmaker's 100 Blocks Volume 14 Blog Tour

Welcome friends! It's one of the most wonderful times of the year - Quiltmaker's 100 Blocks blog tour! Twice a year I relish sitting down with my computer and a hot cup of tea and blog hopping to read about the creative inspiration behind the blocks that appear in Quiltmaker's new issue. I bet you love to do the same thing and that's why you're here :o)

I am so thrilled to have my block, Order in the Court, included in Volume 14. Can you see how it got it's name? It should look like a cousin to the block known as Courthouse Steps.

Order in the Court
Order in the Court

Order in the Court came about as the result of a challenge I put together during Quiltmaker's Volume 12 blog hop this time last year. I asked visitors to tell me their favorite quilt block when they left a comment, and said I may use that as a jumping off point for a new design. Far and away the favorite block of most was the log cabin. I previously submitted a block, Flowers for the Cabin, to Quiltmaker's Volume 13 designed around the log cabin block; you can read more about it here if you're interested. In keeping with the challenge I tried everything I could think of for another design with a log cabin block, but just couldn't come up with anything. I was starting to think I'd have to move to something else for inspiration. Then, I got to thinking about the Courthouse Steps block, and how it's a sister to the log cabin block. Ahhh...Courthouse Steps. Now this block showed some promise.

After sketching out some ideas I started cutting fabric. I knew I wanted my block to have a fun little center, but wasn't sure just what it should be. Here are a couple variations I tried:

First attempt at a new design
My first attempt included a small friendship star in the center with contrasting fabric

Since star blocks came in a close second to log cabin I thought a simple friendship star might work for the center. I also thought I'd like to use contrasting fabric to really draw attention to the center, but this just wasn't speaking to me.

Second attempt with a shoefly center
Second option was to use a small shoefly as the center; still using high contrast colors


Next, I thought a small shoefly in the center would be cute. I do like this, but the colors were just not right so I set the block aside to ponder more options.

Order in the Court
Final version with a square in a square center - just right :o)


Home one day because of a snow storm, I pulled some pretty fabric scraps in softer colors, and sat down to play with them. The always versatile square in a square came about, and seemed to be just the right center for this Order in the Court block. Although, I bet if I changed out the fabrics any of these three options would work fine.

Order in the Court Quilt Top
Order in the Court as a quilt top

Here's a picture to give an idea what Order in the Court would look like as a quilt top. Pretty fun! Rather than looking like courthouse steps it turns out more like chunky plus signs. Don't you love how the look of a block changes when you combine them? I don't have any special software, so this picture was made in Google Drawings by just copying and pasting.

How about a giveaway?! Quiltmaker's is generously giving one of my blog readers a free issue of 100 Blocks, Volume 14For a chance to win leave me a comment telling me about your holiday sewing - do you enjoy making homemade gifts? Are you an early starter, or a last minute crafter? Any good go-to gift ideas you want to share? :o) If you suspect you may be a "no reply" blogger please make sure to include your email address in your comment. I'll draw a random winner on Saturday morning, November 19.

Well friends, thanks so much for stopping by and letting me tell you all about Order in the Court. I hope you soak in a lot of inspiration as you visit all the blogs on the tour. You can read about the tour and find links to the featured blogs on Quiltmaker's blog, Quilty Pleasures

I hope you've enjoyed stopping by :o) I'd love to see you back here again. If you'd like regular updates from Shadows of the Blue Ridge consider signing up for an email subscription (top right of your screen), or you can find me on Bloglovin'.

Tuesday, November 8, 2016

Quilts in the Queue

From time to time it helps me focus if I list and write about the projects I need to make...and finish :o) I don't know about you, but I can get quite distracted by all the pretty quilts on Pinterest, Instagram, flickr, and just online. Next thing I know I'm buying fabric and starting a new project on a whim, and the things I need to get accomplished are pushed off. While it is exciting to start new things, and spontaneity is fun, I feel much better when I stick to a plan. So here goes...

First up is a pillow for a baby shower. This sweet silhouette is call the Not So Spring Deer and is a paper-pieced pattern from Julianna of Sewing Under Rainbows. A woodland theme with a color scheme of gray, white, and a touch of blue was the objective for this little quilt. I just finished the pillow top and have a plan for hand quilting on this. I'd like to find a soft flannel to use for the pillow back.

Not So Spring Deer - a paper pieced pattern
Not So Spring Deer

Right after that baby shower a fourth sweet one is on the way in my nephew's family! I have free reign to pick a design and colors for this baby quilt. Last year a friend of mine gave me some vintage quilt books she bought at an auction. One of them, Quick & Easy Quiltmaking, published by That Patchwork Place, has a fun quilt named, The Fleet Is In which features tall ships. This is another pattern that I knew I'd love to make, so the occasion of a new baby is perfect! I think these bright fabrics will bring it right up to speed with a more modern look.

The Fleet Is In - a tall ships pattern
The Fleet Is In by Nancy Martin

Finally, October was my month to choose the quilt design and destination for the Faith Circle of do. Good Stitches. We are making a Quilt of Valor for a very special young soldier. I'll be writing more about that later, but for now I thought I'd show the pretty blocks the members of Faith Circle sent me.

Triangle Blocks made by the Faith Circle
Quilt of Valor blocks

I asked for half-square triangles and solid blocks measuring 8-1/2" square using Americana colors. My goal is to make a quilt that looks similar to this beautiful design by Ara Jane, and made by the Love Circle of do. Good Stitches.

Okay friends - this is my accountability post :o) We'll see how well I do staying on task! How about you? What are you working on that needs to get finished?

Sunday, October 30, 2016

Time to retire the tomato

I've never been big on pin cushions. I know some quilters make them, swap them, and collect them. Nope, that's just never been me. In fact, I've had the same humble tomato pin cushion given to me by my grandmother 30+ years ago when she gave me a sewing machine. It's one of those tomatoes that had a strawberry on a string that was used to sharpen pins. Well, the strawberry is long gone, but the tomato has endured.


My tomato pin cushion 

Actually, I don't even use a pin cushion as I'm sewing. Once I start pulling pins and using them I switch to a little magnetic platform that came from a museum gift shop as part of a toy. I really like to use this while I sew because I can just drop the pins on it and don't have to be concerned with sticking them into a pin cushion. However, I don't think it's a good idea to store my pins on this platform because it's too easy for them to get brushed off accidently.

do. Good Stitches~Faith Circle~October Blocks
Handy little magnetic platform

Yesterday, my local quilt club had a sew-in day. One of the ladies who attended brought a few small items she had made to give away. She had an assortment of adorable chicken pin cushions...I couldn't resist :o)

I love the sweet fabrics :o)

Check out that crazy hair!

Complete with a sassy tail!

Can you blame me for retiring the tomato? I do believe a chicken pin cushion this cute needs a name, don't you...any ideas?


Sunday, September 18, 2016

Pulling out an old friend

Do you remember this medallion quilt? I started it six years ago with thoughts of having it finished in time for our 25th wedding anniversary. 


It seemed like the perfect quilt to make because it married my interest in quilting with my husbands interest in the Civil War. Now here we are two short weeks away from our 30th anniversary and this quilt is still not finished. 

I still love the cozy use-me-everyday look of this quilt, and it has taught me so much about piecing. I really would like to get it finished. 


In October my local quilt club is holding an all day sew-in. This seems like the perfect opportunity to work on repetitive piecing, so I thought I'd pull this quilt out and get all the facric cut for the next couple borders - that way I can spend the day at the retreat sewing -  and ironing :)

I'd love to hear about a project you've had in the works for a long time, but still want to finish. 

Saturday, September 3, 2016

Acorns of all shapes and sizes

Late summer is always a fun creative time for me. My dear friend, M, has a birthday in August and I always have the best time making things for her. She and I both share a love for autumn so this year I thought I'd use the icon of all things fall-ish, the acorn, as inspiration.

Acorns of all shapes & sizes
Acorns of all shapes and sizes :o)

It all started when I happened across the super cute acorn patchwork pillow pattern by Bridgette of The Family Hearth. This is a great pattern for using up scraps of low volume fabric! I love the bold, graphic design! I made my pillow with a simple envelope style back.

Acorn patchwork pillow
Acorn patchwork pillow - pattern by Bridgette from The Family Hearth

For the quilting I used masking tape to mark simple diagonal lines in order to stitch an "X" through each square.  It's always so fun to quilt small projects because they fit in my Janome sewing machine without any tight pushing or pulling to get the quilting done.

After the pillow was finished I did a bit of searching for some acorn accessories to go with it. On Pinterest I found the pattern for patchwork acorn potholders made with fabric on the front and a dish towel backing.

Untitled
Patchwork acorn potholders

These patchwork acorn potholders by Therm-o-Web are so easy to make, and again, scraps are the name of the game! I really like how the fabric squares end up on point in the potholders. I lined them with Insul-Bright to make them more heat resistant in addition to the dish towel backs.

Finally, I just wanted one more small item to tuck into the package and decided on the little crochet acorn. This pattern comes from Kristi of the blog Engsidrun. I was able to use scraps from some of my favorite yarn for these sweet little acorn.

Crochet acorns
Crochet acorn

I am fully aware that I probably got a bit carried away with theme gifts, but I had such fun that maybe I got away with it? Hope you enjoy the first days of fall! I know I will :o)


Monday, July 11, 2016

The Barbados Bag

A couple weeks ago I was chatting with my friend Kelley, the owner of our local quilt shop, The Scrappy Apple, about wanting a messenger bag pattern. Kelley pointed me to The Barbados Bag pattern by Pink Sand Beach Designs. It looked like a fun pattern and well worth trying.

The bag front allows for fun fabric combinations

I already had the beautiful Purebred paint-by-number roses fabric (by one of my favorite designers, Erin Michael) and thought it would make a perfect late summer/early fall bag. 

Finding just the right accent fabrics proved to be a bit of a challenge. I purchased a couple different options before finding just what I wanted was already in my stash. I ended up using the blue Woodgrain from Michael's first paint-by-number line, Lush. Also, the fun coral Figures fabric by Zen Chic. 

The front features a "hidden" pocket behind the Woodgrain fabric as well as a zippered pocket in front of it. 

Great pockets for stashing sun glasses!

The back has two long pockets.  I just love a bag with lots of organization :)

Inside I used Paint Chips, also by Erin Michael. I have a hard time envisioning how to use the Paint Chips fabric so I think a bag lining will be just right. The inside also includes two pockets-perfect for a cell phone and keys.

So happy to have found a great application for this Paint Chips fabric!

The pattern is well written with good descriptions of each step. There are a ton of pictures - one for every step of the process. All these pictures can look a bit overwhelming at first, but if you just follow the instructions one at a time it all comes right together just as it's written. This is the first time I've done a flat zipper as shown on the bag front and it was not hard at all. I did add a bit more top stitching than the pattern called for - mostly because I just really like the look of top stitching.

The pattern is written for optional swivel hooks on the strap which I chose to use. In addition, I wanted the strap length to be adjustable so I shopped around and found a slide adjuster in the same antique brass as the swivel clips. The finished bag dimensions are 11 tall by 10" wide x 2" deep.

Adjustable slide can be seen on the left side of the strap
I definitely would make this pattern again, and might even try making it an inch taller and wider.  All in all it's a great pattern, and it's so fun to pick out coordinating fabrics for each part! Tomorrow I'll start using my new messenger bag! 


Tuesday, June 28, 2016

Christmas Placemats

Working with Christmas fabrics in the summer is such fun - and usually comes without the "must get this finished" stress of holiday sewing. A sweet young couple from my church is getting married this summer and of course that called for making some special placemats for the bridal shower :o)

In From the Cold Placemats & Coasters
Placemat and coaster gift set

This young couple are both avid coffee and tea drinkers so of course the In From the Cold steaming mugs patterns came right to my mind when I was thinking of what to make for them. Although I knew I wanted to make the mugs, I has no idea for the overall placemat design. After I got the four mugs made I did a simple Google image search for quilted placemats to find some inspiration. As soon as I came across the Lines in the Sand placemat pattern I knew I'd found the perfect setting!

How fun it was to pick just the right fabrics to pair up with the little mugs and cups. I used fabric bits from two of Kate Spain's Christmas lines: 12 Days of Christmas, and In From the Cold. So exciting to use some of these precious fabrics! They've lived in my stash for a couple years waiting for just the right project to pull them out. Although, I hardly made a dent in them. Here is a closer look at each of the four mats:

In From the Cold Placemats-steaming cup No. 1
Steaming cup No. 1

In From the Cold Placemats-steaming mug No. 1
Steaming mug No. 1

In From the Cold Placemats-steaming cup No. 2
Steaming cup No. 2
In From the Cold Placemats-steaming mug No. 2
Steaming mug No. 2

After the mats were stitched together came the daunting question of how to quilt them. I played around with some free motion quilting and did a bit of practice, but none of the designs I thought I could pull off seemed right for these placemats. I opted to go with one of my very favorite quilting patterns - grid quilting. I used the walking foot on my machine and did 1/2" grids. Looking at the mats I think it was a perfect choice :o)

In From the Cold Placemats-complete set
In From the Cold placemats and coasters

Once they were finished I did have a moment of thinking, "White placemats? What was I thinking??" but I think I'll let the bride and groom worry about that! Truthfully, I hope they just use them and not worry about the white. Wishing this young couple many cosy evenings (or mornings!) of toasty warm beverages :o)


Saturday, May 7, 2016

Quiltmaker's 100 Blocks Magazine Drawing Winner!

What an exciting week this has been! I hope you've enjoyed visiting each of the blogs for Quiltmaker's 100 Blocks, Volume 13 block designers...I know I have :o) It's always fun to read about the design process of a quilt block ~ and get some layout options!


Flowers for the Cabin

If you make Flowers for the Cabin I sure hope you'll stop by my blog and let me know, or tag me on flickr or Instagram so I'll be sure to see it!

For the magazine drawing I asked readers to tell me about their sewing machines - what they like, what they don't like. I read about many great machines, from featherweights all the way up to mid-arm machines. Thanks for sharing your insights with me!

I used the Random Number Generator to pick a winner for an issue of 100 Blocks Volume 13 to be sent directly from Quiltmaker's. 


The winner is No. 110!! Hooray!! I've sent Karan an email to let her know she is the magazine winner from my drawing.

Our log cabin begins!

To add to the excitement of the week here is the very first progress shot of our log cabin! One of our future neighbors snapped this photo and sent it to us this morning! We can't wait to go by and see. Hopefully there will be many more pictures to share through the summer. 

Thanks again for joining me as we celebrate 100 Blocks Volume 13! I hope to see you stop by my blog again ~ If you are not already following Shadows of the Blue Ridge you can sign up using Bloglovin, Follow by Email, or Google Friends Connect. All these options are available on the top right sidebar. If you do, be sure to leave a comment so I know you are a new follower :o) Hope you have a great week!