Sunday, January 31, 2016

The Random Sampler Continues

The Random Sampler, my Random Sampler, I know, I know, I've written about this quilt more than once. You can read more about it herehere, and here.  Why does it keep coming up? Well for one, it's still not finished (with good reason), and two, I do believe I love it the very best of anything I've ever made. Shhh...am I aloud to say that?

Random Sampler January 2016
Three complete sections of my Random Sampler

The blocks in this picture complete three sections of the quilt top. There are only two sections remaining, and I already have many of the blocks for those sections made, but they are not sewn together yet.

One of the reasons I like this quilt top so very much is that there is no intent to please anyone except myself - it does not have to be beautiful in anyone else's eyes - not the colors, not the fabrics, not the block choices. I want a quilt that I'm not afraid to actually use, and one that will be at home in our new log home. Watching this quilt top materialize is great fun :o)

I have spent many happy hours pouring over block patterns to include and fabrics to use. Once a block has been completed I've noted that some of them are not my favorite based on the choices I made. But, I've also decided that every block does not have to be wonderful. In fact, it's probably best that some of the blocks recede so that others can stand out. That way they are not all fighting for attention.

Some of my favorite parts are the "filler blocks. The blocks needed to make all the puzzle pieces fit together.

Random Sampler January 2016
Little house blocks reclaimed from another project

This little row of Home Sweet Home blocks is one example. I needed to bring the 12" Tree of Life block up to 16" to match the Fireworks block peaking at us on the left side of the picture.


Random Sampler January 2016
Applique vine

Another favorite is this sparse applique berry vine helping to bring the maple leaf block up to a standard size. The maple leaves were reclaimed from a stalled attempt at a Third Weekend in October quilt. (Note: I'd still like to make that quilt - it's a true beauty!)

New additions to my Random Sampler
Tossed Triangles attached to a Fireworks block

Finally, I made a run of triangles and used my favorite layout, which I call Tossed Triangles because I don't know if there is an actual name, to border this wonderful Fireworks block.

These little "fillers" truly are a few of my favorite things!

If you are interested in working on your own Random Sampler you can go back and start the same place I did. Anita of Bloomin' Workshop has a whole series of tutorials for many of these blocks. We all started our quilts in the fall of 2012. Okay, so I've been working on mine for three years now, don't let that scare you! I am just soaking in the joy of creating one block at a time.

Will you see this quilt top again on my blog...I'd say there is a pretty good chance the answer is yes!


Sunday, January 24, 2016

False Starts and the Design Process

What do these little cuties have in common? They are rejects...all three of them.

IMG_3110
3" Quilt blocks

Last November when I participated in the Quiltmaker's 100 Blocks blog hop for my block, All Points North, I asked readers to leave me a comment with the name of their favorite quilt block. I thought it would be fun to use one of the suggested blocks as a jumping off point for a new design. It was fun to read the suggestions and there was a nice variety of blocks named. I'd never heard of some of them and had fun looking the blocks up online to find pictures.

IMG_3111
Favorite blocks from my blog readers

As you can see from the list log cabin is the clear winner followed by star blocks and churn dash. Well gosh...it was hard to ignore the fact that the log cabin is so popular. Up to this point my method for designing quilt blocks has been to take a traditional block and find some way to modify it. But really, what could I do to change up a log cabin quilt block? I've already modified a star block (All Points North), and a churn dash (Dashing Geese) so I felt like I should give the log cabin block a try.

For two months I have been sketching and mulling over what I could do. I was just about ready to admit defeat and move on to a second choice when all of a sudden inspiration hit! Funny enough I was taking a shower...what is it about showers that helps to clarify thinking? This has happened to me more than once.

I sketched out a couple different variations of my idea in my sketch book then got to sewing. In the process I made the three little reject blocks up at the top of this post. My dear friend, M, was pulled into the review process for a second set of eyes :o) On the first couple tries either the colors just were not right, or the pattern didn't look the way I thought it would in the finished block. It took a bit of ripping and replacing elements to get everything just right. I also put to good use Leanne's (She Can Quilt) post for how to replace a piece in a completed quilt block. Thank goodness I could refer to this post so I didn't have to start from scratch!

I'm so excited to say I have a block stitched up and ready to send in the mail for possible inclusion in Quiltmaker's 100 Blocks Volume 14 which will come out next November. It will be several months before I hear whether or not it is selected ~ wish me luck :o)

Saturday, January 16, 2016

Quilt as You Go: Assembling the Quilt Top - My Experience and Thoughts

Quilt as You Go (QAYG) really calls for two areas of evaluation if you are considering using it. The first area is simply quilting the individual quilt blocks. I wrote about this stage of the process in my previous blog post. Perhaps the biggest factor to consider with this method of quilt construction is how the blocks will actually be joined together to make the quilt top and how the backing fabric will be incorporated. Looking at the front of a quilt one may not even notice that it is assembled using the QAYG method.

Great Grandmother's Patchwork - a Faith Circle Quilt
Great Grandmother's Quilt - a Quilt as You Go quilt

When I first contemplated using QAYG I did some searching online to see how others have used this method. There are several good tutorials out there with varying degrees of difficulty for assembling the quilt top. Because the quilt I was working on was for do. Good Stitches I also wondered if there was any prohibition against using QAYG. However, as part of my research I discovered that Rachel (Stitched in Color), the CEO of do. Good Stitches, used it for one of the quilts she made as part of the Love Circle of do. Good Stitches. Rachel's method is straightforward - not requiring any fussy sashing to cover the joining of the blocks so I opted to use her method.

Here's an overview of what I did to finish my Great Grandmother's Quilt (be sure to check out Rachel's post if you want the full tutorial).

First I used my rotary cutter to square up all the quilt blocks once they were quilted. I did loose a bit of the overall size due to the different quilt patterns on the various blocks, but having uniform size to the blocks is always a good thing. The next step was simply to sew the blocks together.

Untitled
Sewing the quilted blocks together - still no backing fabric


Because the blocks were nicely squared up it was an easy process to sew them together. Next came pressing all the seams.

Pressing seams open
Ironing the seams open

Okay, I will admit this was one of my least favorite stages of the assembly process. Generally I enjoy ironing and almost always choose to iron my seams open. I will just come out and say that an iron does not glide enjoyably across batting - there is a certain amount of drag. Also, since I was ironing both fabric and batting it was harder to get a 1/4" seam to want to stay open, but due to the bulk involved it was not an option to press the seams to the side. As a side note: It is very important to use natural (cotton or wool) batting because of the iron directly on the batting when pressing seams open.

Once the top is complete the back is simply added on and you stitch in the ditch along the horizontal and vertical seams to attach it. If you look carefully in the picture below you can see the grid pattern used to attach the quilt backing fabric.


Great Grandmother's Patchwork - a Faith Circle Quilt
This picture shows the stitching that attaches the backing fabric

As you can see it creates a grid that is almost 12" square. Since the batting is securely quilted to the quilt top you don't have to be concerned about this large unquilted area on the quilt back. In her blog post Rachel suggests using zigzag stitching for this stitching in the ditch. I tried that for about one block length and then ripped it out. I could not imagine zigzagging all over this quilt and instead chose to just use straight line stitching. Edited to add: Surprisingly, you really don't notice any bulk from the quilted seams-not on the front or the back of the quilt. This was one area I was concerned about.

Okay, here's my final thoughts. Did I like using the Quilt as You Go method? For the actual quilting of the blocks I loved it! It was so very easy to quilt an individual block instead of wrestling with an entire quilt top. For the attaching of the back? Well, it certainly could not be much easier than this process, but to be honest I am just okay with the way it looks. Often the back of a quilt will show off the pretty quilting better than a busy quilt front. The back also does not get that yummy just-out-of-the-dryer crinkled look without dense quilting. That being said, would I use this method again? Yes, I think so, but it will really depend on who the recipient of the quilt is.

All in all this was a great opportunity to build up my free motion quilting confidence and give a new construction method a try. Next time I may try using one of the sashing methods to join blocks - but we'll see :o)


Monday, January 4, 2016

Quilt As You Go: Quilting the Blocks - My Experience and Thoughts

Quilt As You Go {QAYG} is a technique that captured my attention early in my quilting journey. While attending a 2009 quilt show in Cumberland, MD I watched a demonstration for QAYG placemats. It made total sense to me that this would be a great method to learn and develop free motion quilting skills. For some reason it took me six years to give it a try - I highly recommend you not wait that long.

All the blocks have been quilted
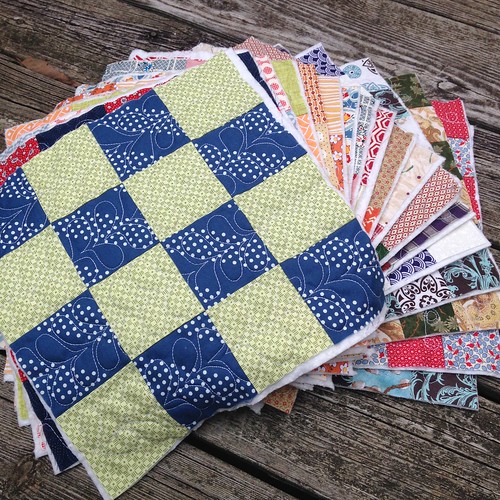
This stack of blocks provided a lot of QAYG practice

Before going any farther let's define quilt as you go. Regular quilt making begins with assembling a quilt top, then making a quilt sandwich (top, batting, and backing), and finally quilting the entire top as one large piece. QAYG breaks the whole process down to the block level. A quilt block is completed, layered onto batting and then quilted - at this stage there is no backing fabric. One reason I really wanted to try this method of  quilt making is the small size of my sewing machine. Some of you may remember this picture:

My Janome sewing machine
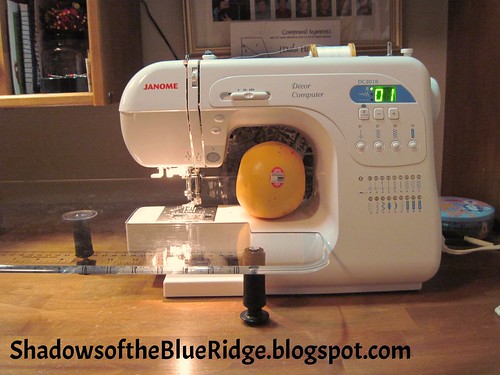
Yes, that is a grapefruit
As you can imagine it is pretty difficult to stuff a large quilt through the throat space on my sewing machine. If I only have to quilt one block at a time it frees up my hands and arms to focus on the flow of quilting rather than pushing, pulling, and twisting a bulky quilt through this relatively small space.

Before beginning I did some research on QAYG methods, considering both quilting the blocks, and what I was most concerned about, assembling them once they are finished. In this blog post I am going to focus on the quilting of the blocks and will save my thoughts regarding assembly for a Part 2 post. Okay, enough of the background...on to my experiences and thoughts :o)

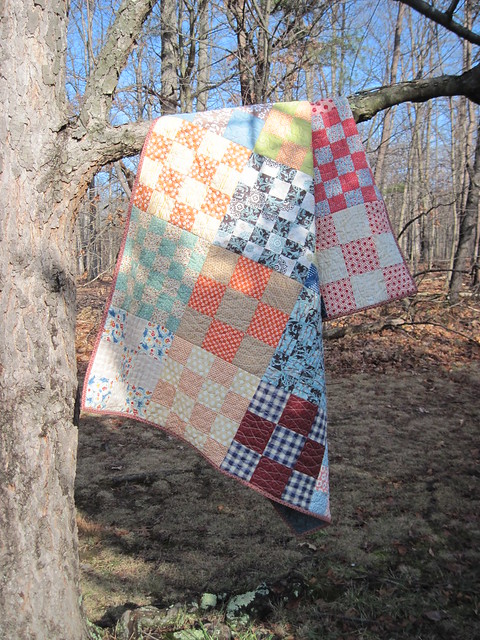
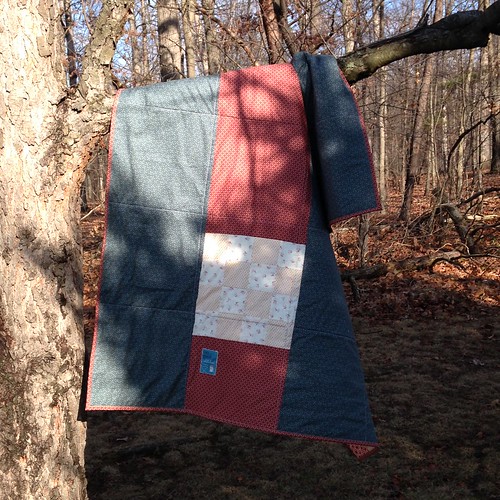
My recent quilt finish, Great Grandmother's Patchwork Quilt, is made up of three different blocks: 9 patch, 16 patch, and 36 patch. These blocks provide a great opportunity to give QAYG a try. First I selected a different quilt design for each of these blocks.

Simple edge to edge quilting
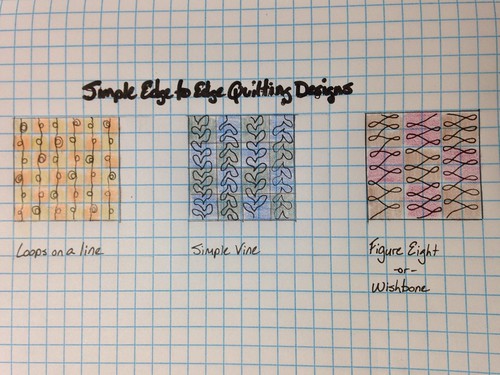
Simple edge to edge quilt designs
All three of these easy quilt designs are suggested in Christina Cameli's book, First Steps to free-motion quilting. I mentioned this book last year in another of my free-motion quilting posts. I highly recommend it (please note I purchased my own copy of this book and am not being asked to endorse it.)

For the actual quilting I grouped my blocks together and quilted all of each block at the same time, for example, I did all of the 36 patch first, then all of the 9 patch, and finally all of the 16 patch blocks. Also - and this is an important point - keeping in mind that a run through the washer and dryer improves the look of all quilting, I gave myself permission to learn how to do these designs on the actual blocks. In other words, the more blocks I quilted the better I got. The first few times I did each pattern it looks like beginner quilting.

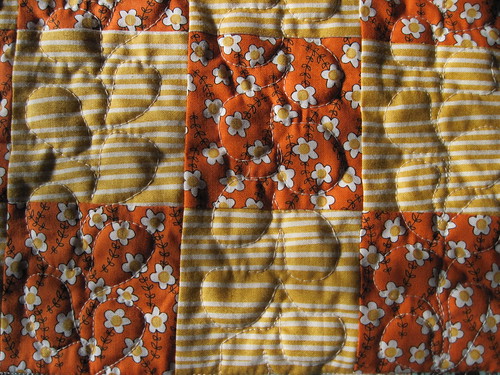
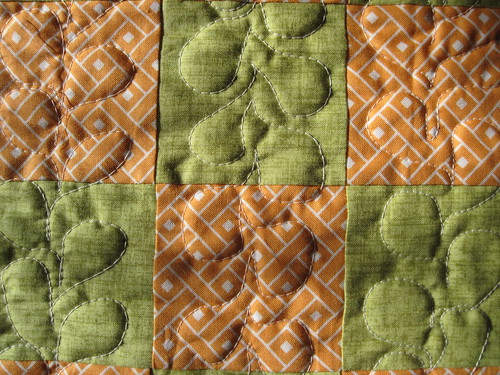
I started with the loops on a line design because I thought this to be the easiest of the three. It actually was very easy and did not matter if I was working top to bottom or bottom to top on the block I got the same look - in other words I did not need to rotate the block when I reached the edge, I just stitched over to the next column and began again. Next, I did the figure eight/wishbone design. I loved the smooth movement of this design and it really was easy to find my rhythm with it. For this design I also I did not have to rotate my blocks but it took a bit more mental processing to switch from quiting up the block to quilting down the block. Finally, I saved the vine for last because I thought it was the most difficult of the three designs. For this one I definitely had to rotate the block with each pass and always worked bottom to top. Here's my skill progressions with the vine pattern:

Free Motion Quilting-beginner
Vine: early attempt yields poorly formed leaves and inconsistent sizes


Free Motion Quilting - bit of practice
Vine: after a few blocks the vines are starting to look more uniform in size and shape


Free Motion Quilting-end of quilting session
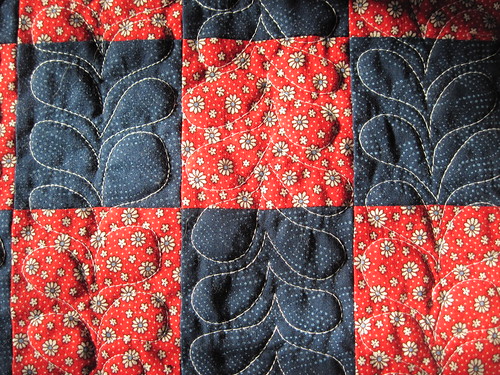
Vine: finally a block I am proud to show. Good spacing, shape, and sizing :o)

I did notice that since I was only quilting a top and batting (remember, there is no backing fabric on the blocks at this stage) there is more drag when moving the blocks around. I did use my Supreme Slider and it was a big help. However, even without a Supreme Slider this would not be too difficult given the small size of my blocks.

Overall QAYG was a great experience! It was so fun to quilt small blocks and to try different free-motion quilting patterns without having to wrestle with a large quilt. It was also exciting that it really did not take long at all to see improvement in my quilting - a big motivator!

I'll write up another post soon giving my thoughts and experience with assembling the quilted blocks and adding a backing, so stay tuned! In the meanwhile run, don't walk, to your sewing machine and give quilt as you go a try on some of your quilt blocks - you'll have fun! I promise :o)


Friday, January 1, 2016

Beginning the New Year With the Old

Are you a list maker? Historically I am not - I just mentally go over what I need to do and begin. The process of preparing for a move after so many years in our current home (27+) has got my mind going in all sorts of directions for things that need to get done before the move is imminent. So many, in fact, that I find I really do need to be listing them. Unfinished projects is a category that's high on the list. I don't want to have a pile of things that never got finished, so this past summer I began really disciplining myself not to buy new supplies and patterns, or spend a lot of time surfing social media (think Pinterest, Instagram, blogs, flickr, etc.) looking at all the latest and greatest. Instead I pulled out my unfinished projects and assessed how they might be put to use - either as is, or with minimal additional work. As a starting point I chose my French General Swoon blocks.

Five French Swoon blocks all in a row


I nick-named these blocks French Swoon. I've mentioned before that Rouenneries by French General is my all time favorite fabric. You really can't go wrong with any of French General's fabric lines. The subtle color shadings and patterns mix and match so well and add rich depth to any textile project. Rouenneries first came out about the time I began quilting in earnest and by the time I discovered it most quilt shops were down to odd bits and pieces left over. I searched far and wide on Etsy and quilt shop Web sites to collect whatever I could find. Perhaps that's what makes my stash so precious to me :o)

When the Swoon pattern (by Thimbleblossoms) came out my sewing skills were just about at the point where I thought I could make these blocks. They are pretty complicated - each block is made up of 43 little units including squares, half-square triangles, and flying geese. Most of the Rouenneries I had at that time came from 5" charm squares, so I could not make the original 24.5" block,  Instead I just about broke my brain and reduced the pattern down to make 12.5" blocks. It took me quite a bit of figuring (math is not my strongest area) to come up with the fabric dimensions. I was pretty proud of myself when I got the first block done:


French Swoon!
My first 12.5"-ish Swoon block


Now, one interesting challenge I can point out to you about going back to old projects - you will notice right away that your sewing skills have improved since the item was initially made. This presents both a challenge and an opportunity. First, I discovered that since I had yet to master the perfect scant 1/4" seam all five of my Swoon blocks are a different size...this will be interesting. Next, I noticed that since I made these four years ago...and my sewing skills have improved since then...I am no longer worried about ruining them when it comes time to quilt them...can you say, "HOORAY!" with me. Most quilters know that feeling in the pit of the stomach about not wanting to quilt your "perfect" top because you'll ruin it. Well now I can clearly see that's it's not perfect to begin with. How's that for taking the pressure off :o)

Back in the spring I happily discovered that these five, already completed blocks, will make a beautiful runner for our dresser - no additional blocks needed.

New life for French Swoon blocks
Envisioning a runner for our dresser

Having just finished all of the things I needed for Christmas giving I'm ready to begin the new year with an old project. Really, I can't wait!

Hope you find a gem to begin your year with - be it an old one like mine, or a fresh new start! I'd love to hear what you'll be working on :o)