Monday, April 17, 2017

Bear Garden Cabin - almost ready

It's been awhile since I've shared an update on our log home. I'm thrilled to report that it is almost ready for us to move! It's been such a journey to build this home. I'm writing this post as a bit of a journal to record details for myself, so you may want to skim if you just want to see the pictures :o)

Bear Garden Cabin
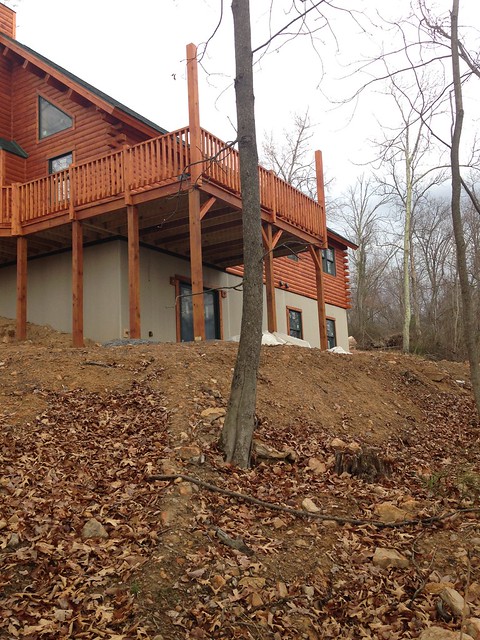
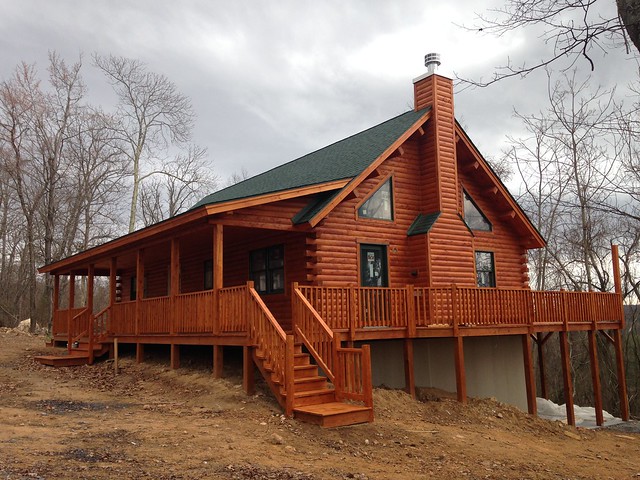
Almost all the work on the exterior is now finished
This picture was taken a month ago - since then the gravel driveway has been put down and grass seed/straw cover the bare soil. The exterior of our cabin is stained with Perma-Chink in the Lifeline Ultra 7 Cedar color. I've read that this "reddish" color is traditional for the region we live in. We actually chose it because darker stain is supposed to provide more UV protection for the logs than lighter stain. We didn't want to go with a dark brown, so we selected Cedar since it is midway between the color choices. I love how rich it looks with the green trim.

Untitled
Steep drop-off behind the house

Behind the house our builder had to move a lot of soil so that there is a bit of space before it starts to drop off down the mountain. We will need to either plant ground cover, or put in some type of retaining wall to prevent the soil from eroding away. The tall corner posts up on the deck were my request. We have something similar at our current house so I can hang baskets of flowers. Currently, I also use them to hang bird feeders, however we don't want to attract bear onto our deck, so I won't hang bird seed on this deck.
Untitled
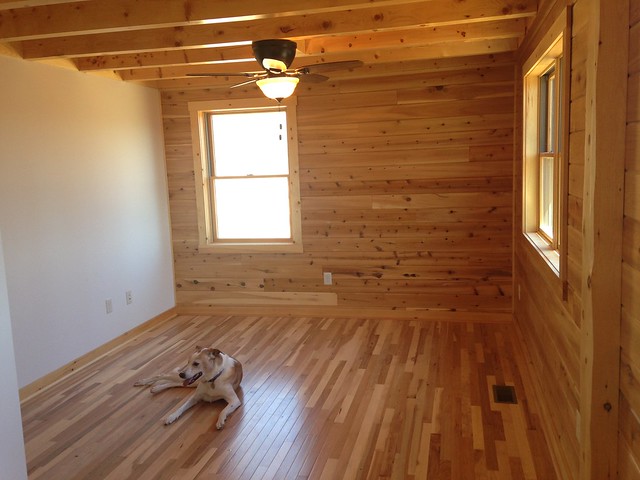
Completed master bedroom

The master bedroom is the only 100% complete room so far. The exterior walls and ceiling are northern white cedar. They are finished with a clear topcoat. It's amazing how much the clear sealer brought out the wood grain and knots. I'm also surprised at how much darker they are every time we go up to see the house. I guess the wood is seasoning. The entire main level (except master bath) has 2-1/4" hickory hardwood on the floor. We chose hickory for a few reasons: it's a very hard wood so that will aid in scratch resistance, the color variations will blend together the various woods used in the house, and the color variations combined with the narrow width will also help mask the inevitable scratches that will come with living in our home. I like the almost-tapestry appearance of it. I think our dog, Shiloh, approves.

I'm so glad we decided to use a little bit of drywall in the bedrooms and bathrooms. My first inclination was to go all wood on the walls, but my husband thought we might want the option to be able to add a bit of color. Now that I see this room finished I'm glad it's not wood all around - I think that might have been a bit much.
Untitled
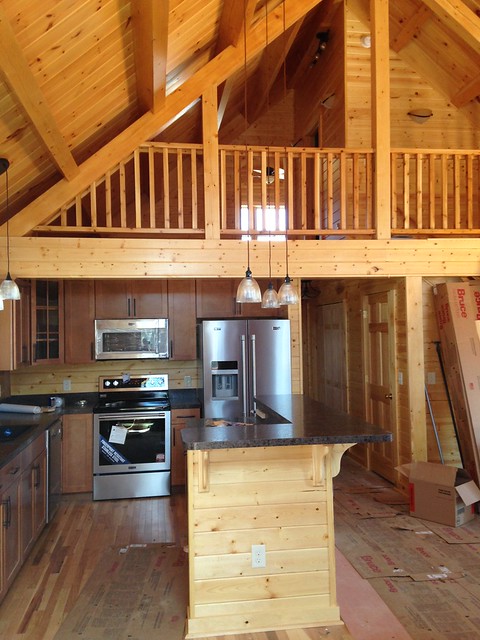
Kitchen with loft above

I've been most nervous about the kitchen. Since the house has a great room the kitchen is fully in view. It was so hard to pick out all the options (cabinets, counters, lights, appliances, sink, faucet, etc.) without knowing how the walls were going to look once they were stained, or how the hickory floors were going to look. The interior walls (and kitchen island) are all pine instead of cedar, like the exterior walls, and you can see the difference in color. I'm not sure why our builder mixes cedar and pine. It was hard to choose the stain color for the kitchen cabinets with so many different wood types. My husband did not want painted or black cabinets, so I had to choose a color to stain them. I really appreciate the advice given to me by the cabinet specialist I worked with at Lowes. She advised me not to try and match the various woods, but instead to think of them like furniture and let them all have a different grain pattern and stain color. Now that I see them all together I think it was sound advice.
Kitchen details
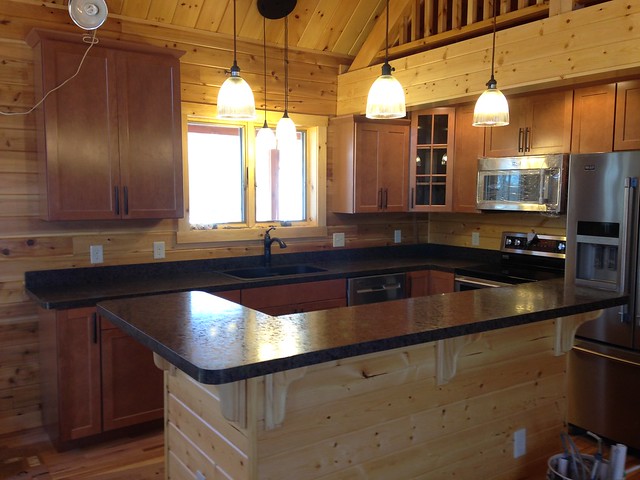
Details of the kitchen

Something I've learned about log homes is that they truly are custom - each step has to be figured out like a puzzle. For instance, look at the upper cabinets - can you see there are three different cabinet heights? The cabinets above the stove and refrigerator go right up to the ceiling (the loft is above). If you look closely at the cabinet to the right of the sink you can see it is shorter. That's because the main beam holding up the second floor is huge! Because of this we needed that cabinet to be shorter. Now look at the cabinet to the left of the sink - see how tall it is. That's because a shorter cabinet would look too small and like it was floating with the cathedral ceiling above it. I was so grateful to work with a knowledgeable (and reassuring) cabinet planner! She assured me that they would turn out looking great, and she was right :o) Just to add a focal point we added one glass front cabinet door in the corner.

Trying to stay within our budget we chose Wilsonart upgraded laminate counters in a finish called river gemstone. My thought was the dark counters would make a nice contrast to all the light wood in the rest of the great room. I paired them with a Franke granite finish sink and an oil rubbed bronze Moen faucet.

The lights were another difficult decision. The three over the island needed to hang approx. 13' down from the cathedral ceiling, which limited our choices. In the end we found these simple pendants that are suspended by their wiring and allowed us to choose any shades. To provide maximum light efficiency we chose glass instead of metal shades, so light will shine up as well as down. We've been told wood does not reflect light the way that painted surfaces do, so we wanted to make sure the kitchen is bright enough.

My initial plans did not include stainless steel appliances, but during the Black Friday appliance sales I was blessed to find this set. It had been purchased by someone else who never took delivery. Because of this they were offered at a super sales price. Lowes held them for us at no cost for over four months! Such a blessing!
The Great Room
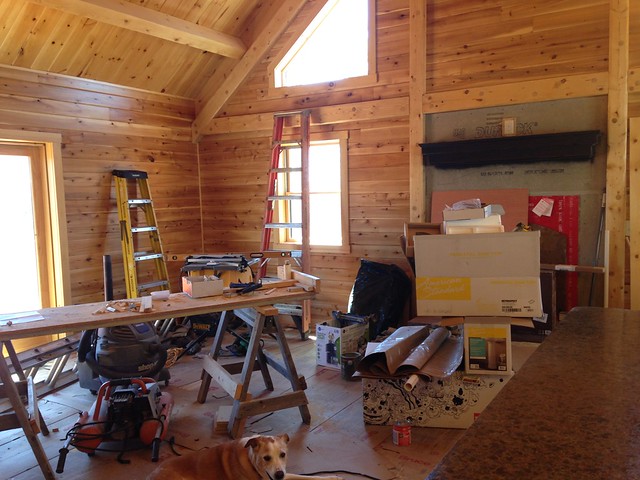
The great room - holding spot for all tools

Finally, we come to the great room. The walls and floors are all finished (floors are covered with cardboard to protect the wood). Just the ceiling fan and stone on the fireplace are left to complete. Stone will completely fill the area within the wall stiffeners shown in the upper right side of this photo. Once the fireplace is finished I'm pretty sure just some plumbing/water supply work needs to be done, then the house should be move in ready.
Untitled
Katahdin Cedar Log Homes

It's been almost an entire year since our builder, Cabin Run Construction, broke ground in May of 2016. At times it seems like things move fast, and at times it seems like they move slowly. But, all-in-all it has truly been a dream come true to build our log home and we are so very blessed to have this experience. I'll be sure to let you know when we move in :o)

Wednesday, March 15, 2017

Quilt of Valor - Faith Circle

Twice a year I have the opportunity to select the quilt design and recipient for one of our Faith Circle quilts. Last fall I knew my turn was coming up, and I knew who I wanted to make a quilt for - a special soldier who fought for our country in Iraq. I have such respect for the Quilts of Valor Foundation as they strive to wrap in love members of our armed forces who have been touched by war.

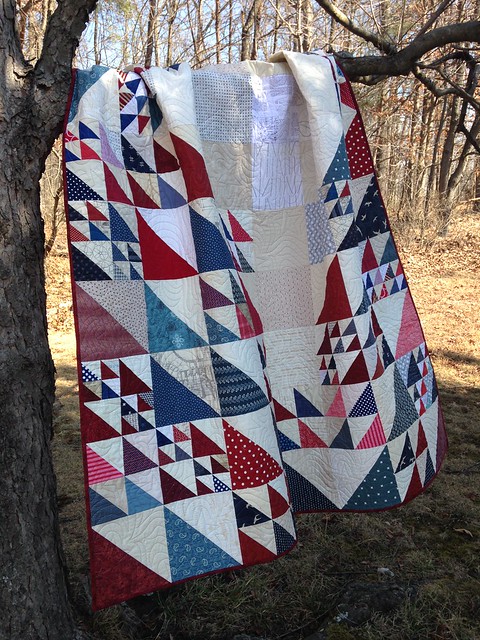
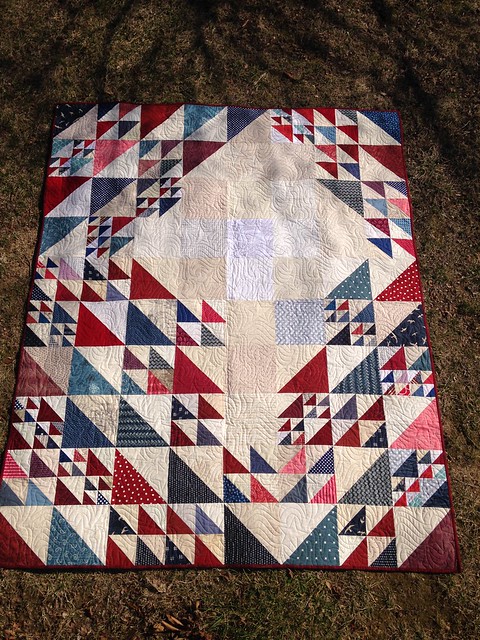
Quilt of Valor - October 2016 quilt
Quilt of Valor

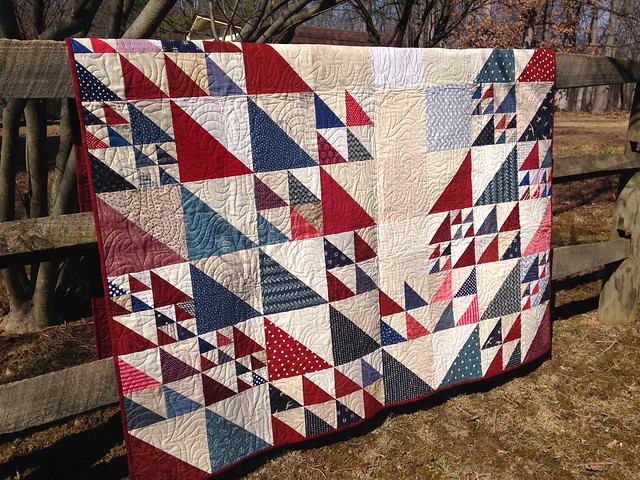
Quilts can often have a more feminine look to them, so I did quite a bit of looking to find a pattern/design with a more masculine appeal. As soon as I saw this quilt designed by the talented Ara Jane Olufson I knew it was the right one. She happily granted us permission to use her design for our quilt.

Quilt of Valor - October 2016 Faith Circle Quilt
A bit of breeze to add movement


The Faith Circle ladies were so wonderful to make extra blocks and send fabric squares so that our quilt would be of a nice size. It ended up at 64" x 80" before washing. Perfect size to snuggle up on the couch with!

Quilt of Valor - October 2016 Faith Circle Quilt
This picture shows off the nice texture added by the long arm quilting

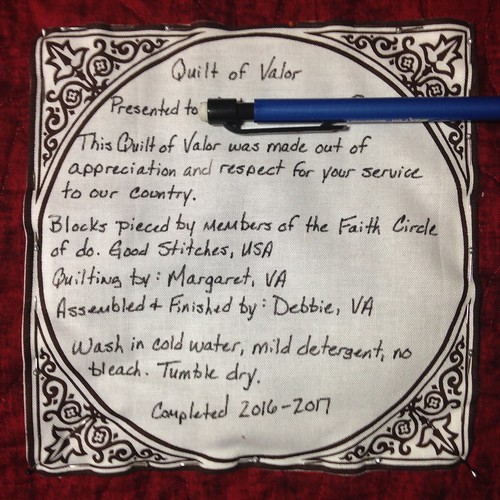
The long arm quilting was graciously done by a local friend - we agreed that an all over star pattern was the best choice.  The Quilts of Valor Foundation has guidelines they request you follow for all quilts, and included in that is the label. I usually struggle with what to put on a label, so I found their guidelines to be very helpful.

Faith Circle Quilt Label
I used a Pentel Gel Roller for Fabric pen to make the label

This was a very satisfying quilt to work on and finish. I hope it will be a blessing to it's intended owner.

The Faith Circle is a virtual quilt group operating under the guidelines of do. Good Stitches. If you are interested in finding out more, or joining, you can do so here.

The mission of the Quilts of Valor Foundation is to cover service members and veterans touched by war with comforting and healing

Sunday, January 1, 2017

Day One: Where to go from here

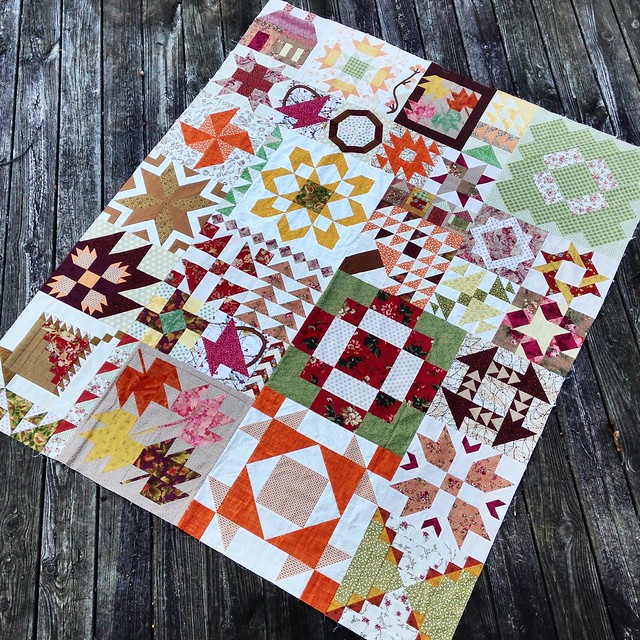
Well, here we are at Day One of a brand new year. In my sewing room are several work-in-process quilts at various stages of completion, in addition to supplies for a couple of projects not yet begun. One project I'd like to bring to a close this year is my Random Sampler Quilt. I finished the quilt top several months ago, but never shared a picture of it.

Random Sampler - completed quilt top
Random Sampler quilt top

This top was such an enjoyable journey. It began as a quilt-along and ended up including several quilt blocks I've designed. To round it out I thoroughly enjoyed searching for blocks I loved to fill in all the various spaces.

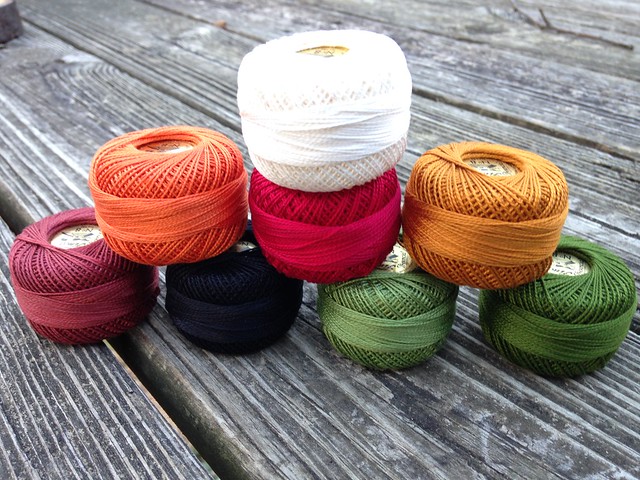
While sewing the blocks and filler strips needed for this top, I had time to mull over how to quilt it: machine quilting -vs- hand quilting. After working with perle cotton on my last two projects I decided I wanted the Random Sampler to be hand quilted using big stitches and No. 8 perle cotton. It's just hard to beat the beautiful texture created by hand quilting, and the slow pace is so relaxing. My local quilt shop has a great inventory of Presencia Finca and I had no problem matching colors with my quilt top.

Untitled
No. 8 perle cotton

As soon as I purchase batting suitable for hand quilting, a good thimble, and cozy flannel for the backing I'm all set to begin, and I can't wait!

For my family 2017 is a year that will see us realize the dream of moving into our log home in the not too distant future. This will be a great quilt for snuggling on the couch with my husband while we look out over the mountains and enjoy our new home.

Blessings!
~Debbie

Friday, December 30, 2016

Inspiration - Nordic Style

Do you ever ponder where inspiration comes from? I enjoy thinking about that sometimes...looking at things I've made and reflecting on where the idea came from.

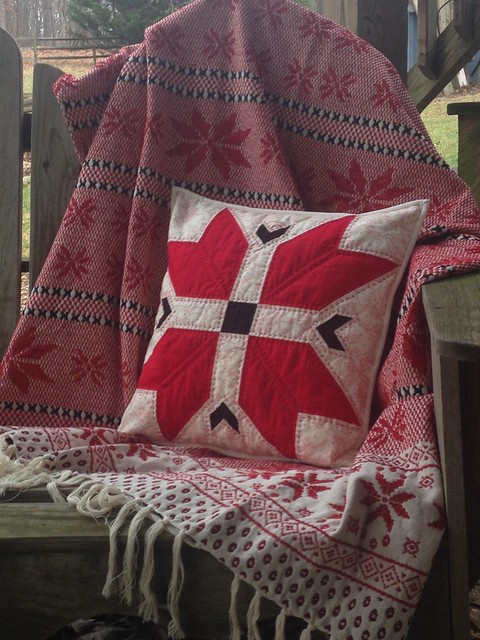
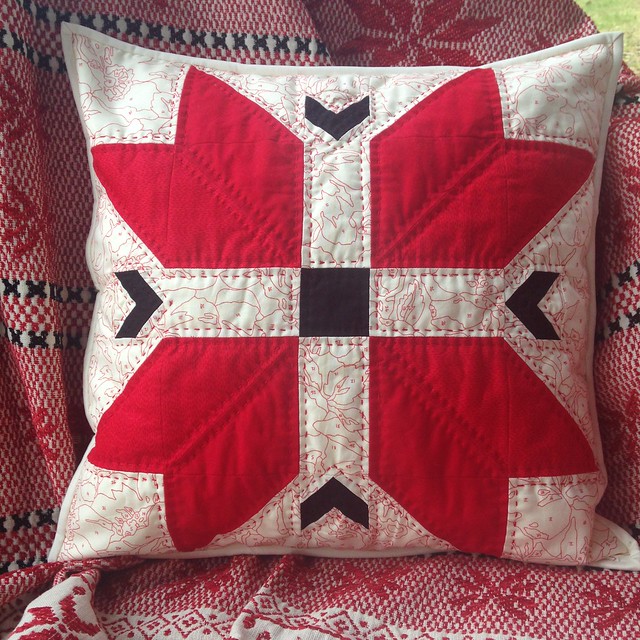
Nordic throw with a matching pillow

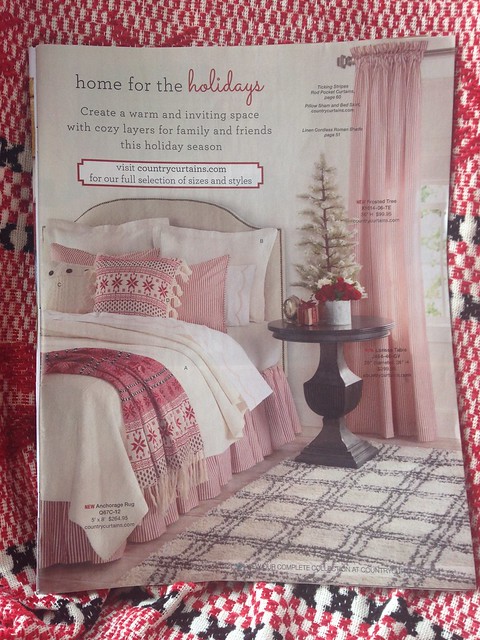
Early last fall I received a Country Curtains catalog and saw this picture of a cozy and inviting Christmas bedroom. I was dreaming of how perfect something this look would be in the guest room of our log home :o) I just knew that great Nordic throw would be the perfect companion for my All Points North quilt block.

Untitled
Festive Christmas bedroom - Country Curtains catalog


I purposely kept my Christmas making to a minimum this year because of all the time being spent on preparations for our log home. However, if you're a maker then you know it just doesn't feel like Christmas if you don't have at least one handmade gift to give ;o) This pillow was a nice project to occupy myself during the evenings between Thanksgiving and Christmas. Deep saturated reds and inky black fabrics gave a nice crisp look to this Nordic-style block.

All Points North - Christmas Pillow
All Points North - Nordic style

The background fabric was a fun departure from my comfort zone - my first inclination was to play it safe and use Kona bone (a solid fabric), but I have long admired printed background fabric in the work of others. I decided to go for it and pulled from my stash the red/cream Purebred Derby Preakness paint-by-number fabric from one of my favorite designers, Erin Michael. It adds a fun layer of dimension to the pillow.

The beautiful hand work of Mary Dugan (Molly Flanders Makes blog) enticed me to quilt this with big stitches using perle 8 cotton. Hand quilting is a comfortable, slow process that allows me to sit in the living room with my husband in the evenings instead of at my sewing machine.

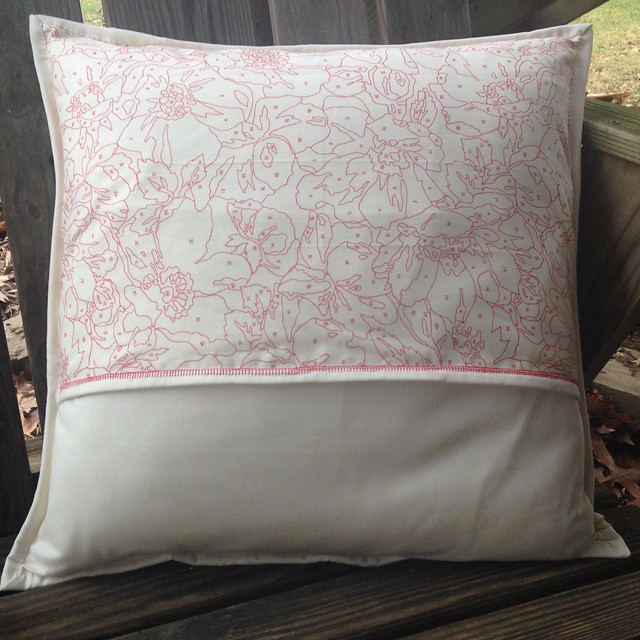
Envelope-style pillow back
Envelope-style back with buttonhole stitch trim

My favorite way to make a pillow back is the simple envelope style. I always plan on a generous overlap and usually use 2/3 of the pillow dimension for my fabric measurements - this ensures no pillow insert peeking out. To add just a touch of cozy to the back I added machine buttonhole stitch to sew down the binding across the back.

This was a satisfying final project for 2016 and has been gifted to a sweet friend. I think that cozy Christmas bedroom picture provided just the inspiration I needed :o)

As 2016 comes to a happy close I'm looking forward to what 2017 brings. Hopefully, a move into our log home for my family! What are you hoping for in the New Year?

Blessings,
~ Debbie

Monday, November 28, 2016

Baby shower goodness

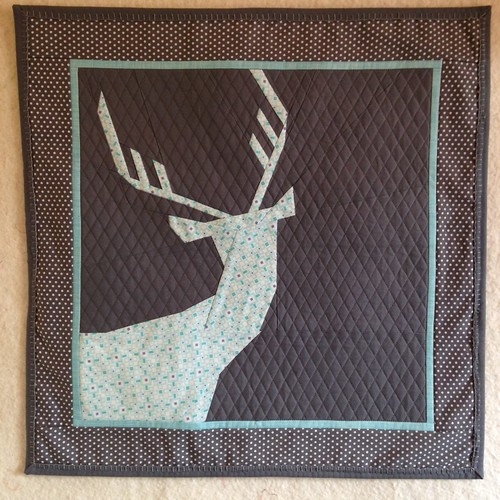
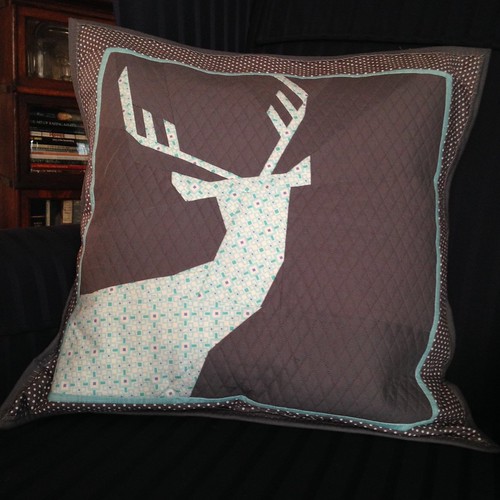
How fun it is to find just the right pattern when needing to make a gift. A few years ago Julianna, of Sewing Under Rainbow, shared a paper pieced tutorial for the Not So Spring Deer. This deer, to me, looks like a young buck, and therefore perfect to honor the upcoming arrival of a certain little mister :o)

Paper pieced deer wall hanging
The "Not So Spring Deer" paper pieced pattern as a wall hanging

This little man's mama is creating a woodland setting in baby's nursery and using neutral colors with a touch of blue. The geometric print from Kate Spain's Good Fortune line seemed the perfect print for paper piecing as the densely printed pattern blurs well where the paper pieces come together. Looking through my stash I found a nice variety of medium dark gray fabrics to round out the project.

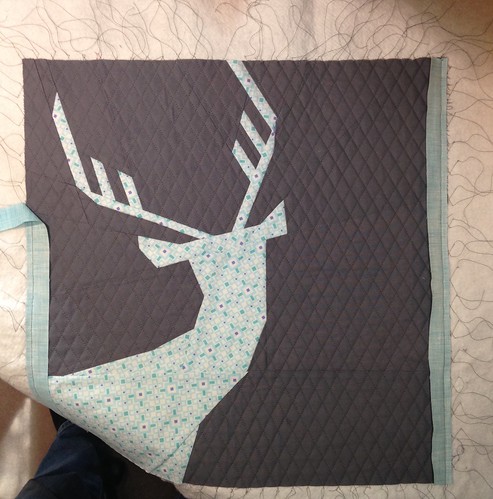
Quilting process shot
30 degree diamond quilting

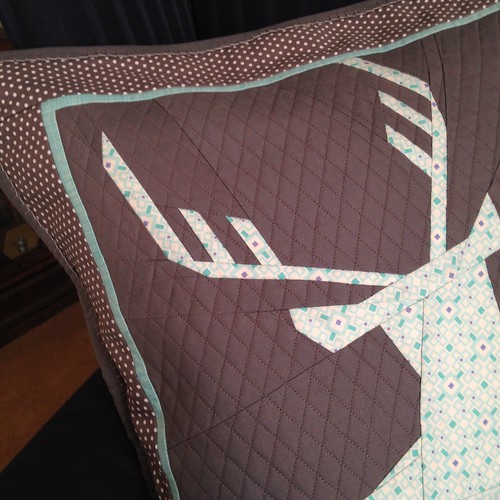
I wanted the solid gray background fabric to have a dense quilting that did not extend into the borders. To accomplish this I layered the deer panel onto the batting; then used a ruler to mark 30 degree diamonds, and the edge of the walking foot to quilt the lines approx. 1/2 inch apart. Each time I came to the deer I cut the thread, knotted it, and wove it in. After the quilting was finished I stitched the borders onto the batting.


Half inch 30 degree grid quilting
30 degree diamond quilting

The dense quilting does a nice job of making the deer stand out from the background. A thin blue 1/4 " border adds a nice frame, and then some fun polka dots to enhance the young look of the buck.

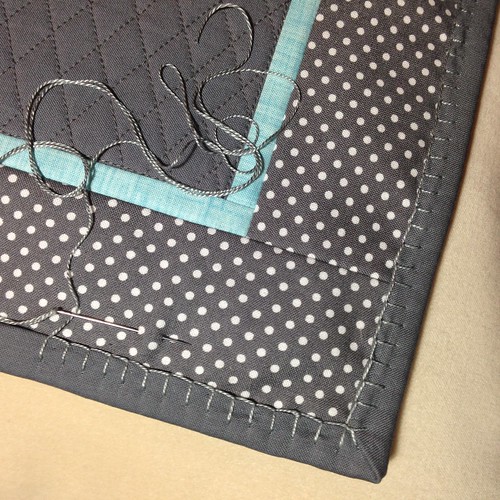
Perle cotton button hole stitch
Perle cotton buttonhole stitch
Somewhere I remembered seeing buttonhole stitch used to sew down binding. I thought this would add a nice hand-stitched look as well as a texture, and I just happened to have the perfect gray perle cotton on hand! I love how it looks, but was surprised at how hard it is to do buttonhole stitch through cotton; definitely hard on the hands. I don't think I could do this on a larger quilt.


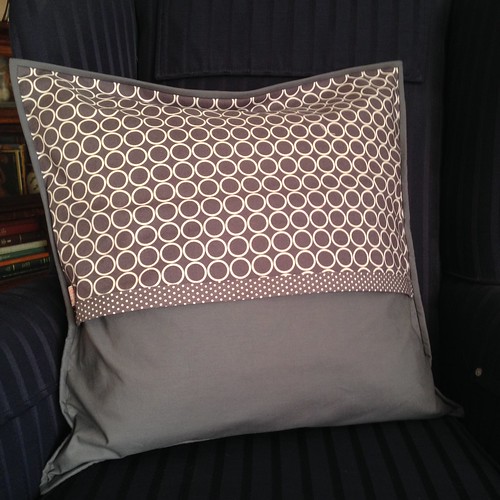
Envelope style back
Envelope style back

I found two more prints in my stash which are just the right shade of gray to finish out the mini quilt. For the back I opted to go with an envelope closure; this allows the mini to be used either as a wall hanging, or a pillow. Using fun prints makes the back just as show-worthy as the front :o) Projects like this are so much fun! I love finding just the right fabrics and considering each little detail.

Paper pieced deer as a pillow
Not So Spring Deer as a pillow

 I'm praying for the safe arrival of this sweet little boy, and blessings for his mama and daddy as they experience the joys of their first baby.


Friday, November 25, 2016

Cabin update & contest winner

I've been thinking that's it's time for a cabin update! Would you like to see how our Katahdin Cedar Log Home is coming along? Join me for a tour :o)

October 30, 2016 Progress
Loving the green shingles and window trim!

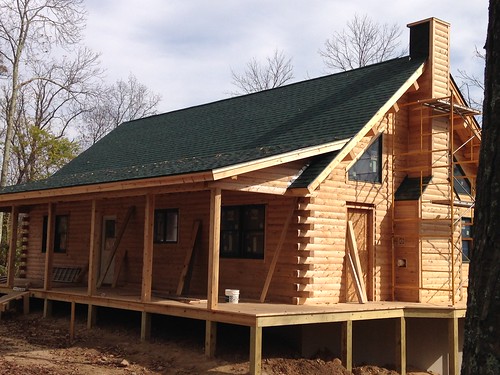
This picture was taken about a month ago. Our builders, Cabin Run Construction, are doing such a nice job! The roofing is complete and all windows are installed in this picture. The log walls are ready for the finish/protective sealer to be applied. We've decided to go with Perma-Chink in the Cedar colorway; this seems like a natural choice since our home is built with cedar logs from Maine.

Full glass door on right side of log home
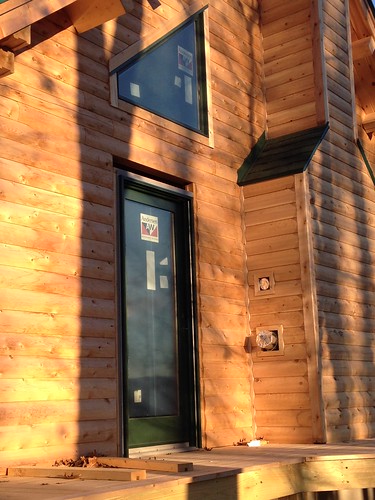
Door into great room

This side door leads into the great room. I'm sure we'll use it a lot for fire wood :o) I'm so glad we decided to wrap the decking around the side of the house. The original plan was to just have a front porch and a back deck. But once we saw how the land would be graded around the house we opted to have this decking to connect the front and back. It's one of my favorite features.

Living room sliding glass door
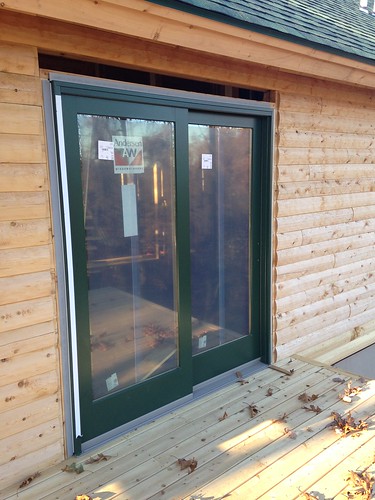
Sliding glass door on back of house

From the living room to the back deck we opted for a sliding glass door instead of a swinging patio door. This decision was based mostly on my thinking that a sliding door takes up less floor space to operate.

Back decking
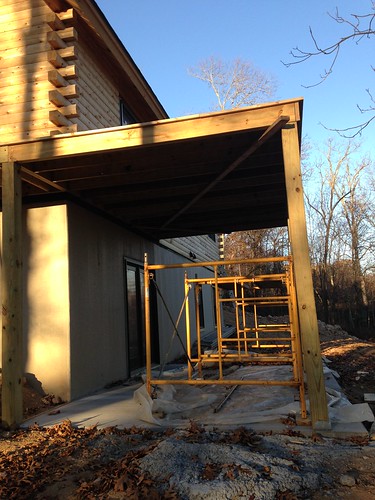
Deck off the back of the house

We kept the deck off the back of the house a cozy size. This picture shows how it covers the patio door leading into the lower level. Both panels of the patio door are functional in order to allow large items to be moved in and out with ease. We won't have a carport or garage for awhile so the lower level will need to store kayaks and garden equipment. Since the back is the shady side of the house we had a concrete pad poured under the deck to prevent a muddy mess.

October 30, 2016 Progress
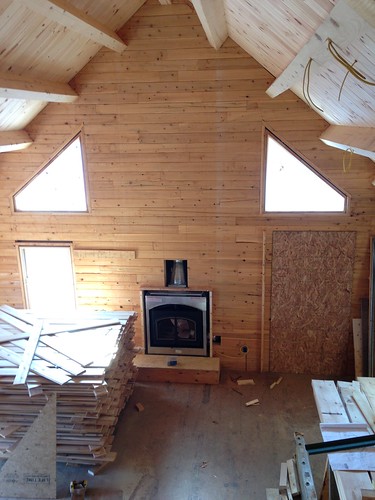
Quadra-Fire Wood Fireplace

In the great room the living area is to the left and the dining space to the right. We had a wood burning insert installed in the fireplace for maximum efficiency. This unit has an internal fan and a burn time of up to 16 hours. We are going with native field stone cut to a thin veneer and hope to do a rough hewn mantle. That big pile of wood to the right is actually cedar paneling. Katahdin log homes are built using what they call the energy envelope system. The inside of the house will be lined with rigid foam insulation and then covered with the cedar paneling. So, it looks as if you are seeing the inside of the logs, but it's actually the cedar paneling. This greatly increases the R value of the walls.

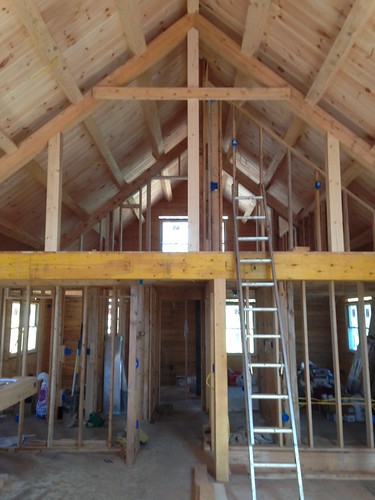
Interior partition walls
Looking the other direction...

When you turn around and look the other direction you can see the other rooms of the cabin. On the upper level there is a guest bedroom to the back with a loft and 3/4 bathroom in front. On the lower level the kitchen will be to the left with the front entry hall/mudroom and master bathroom behind. To the right is the master bedroom, laundry closet, and a small office. That yellow LVL beam will be encased to make it more attractive :o)

This is pretty much where we stand right now. We'd hoped to be moving in by the end of the year, but it doesn't look like that's going to happen now. We've been busy picking out appliances, fixtures, and flooring. The decisions are both fun and a bit stressful; knowing these products are expensive, and must last a long time puts pressure to make wise choices.


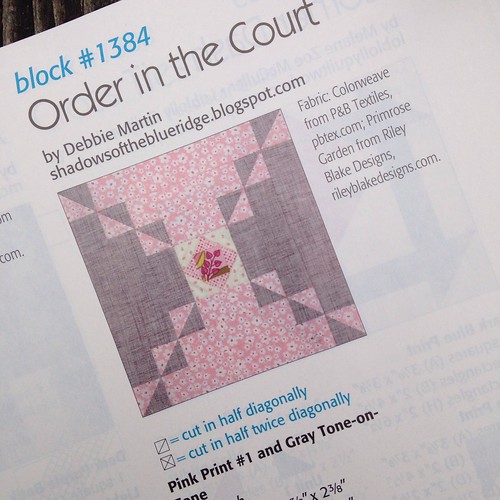
Okay - now for the results of the Quiltmaker's 100 Block Volume 14 drawing! The Random Number Generator chose No. 18! The winner is Bonnie and she sent me her mailing information which I've forwarded to Quiltmakers. Congratulations Bonnie!


Thank you all for celebrating my block, Order in the Court, with me. If you end up making one I'd love it if you'd tag me! I've already submitted a design for inclusion in Volume 15 which will be published in the spring ~ wish me luck :o)

Order in the Court
Order in the Court by Debbie Martin